2.1.1. Task – Setup basic cloud components in Azure
Basic cloud components are needed first. Things like Virtual Networks and Resource Groups are required prior to deployment of virtual machines. You will configure these items in preparation for the WordPress deployment.
Log into the Microsoft Azure Portal – https://portal.azure.com
Click the green + Create a resource at the top left corner of the screen
Click on Networking
Click on Virtual network

Use the information provided in Table 2.1 below to create a virtual network. Replace ## with your assigned student#.
Table 2.1
Key Value Name student##_vnet Address space 10.10.0.0/16 Subscription <User Unique> Resource group Create new: student##-rg Location <Closest Azure DC> Address Range 10.10.0.0/22 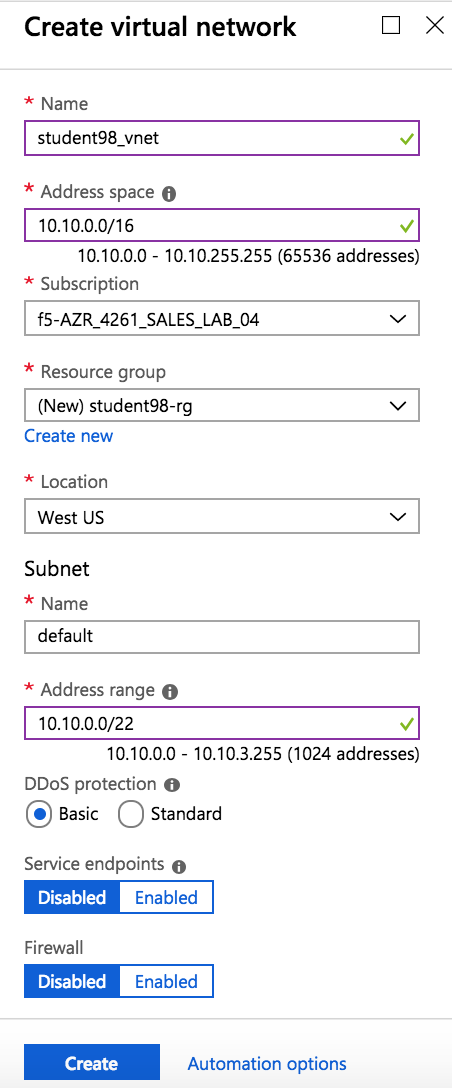
Click Create then continue after “Deployment succeeded” notification.
2.1.2. Task – Deploy WordPress within Azure
In this task you will deploy a virtual machine and install the WordPress application.
Click the green + Create a resource sign at the top left corner of the screen
Start searching the marketplace by typing ‘bitnami wordpress’ in the search field and hit Enter
Select WordPress Certified by Bitnami
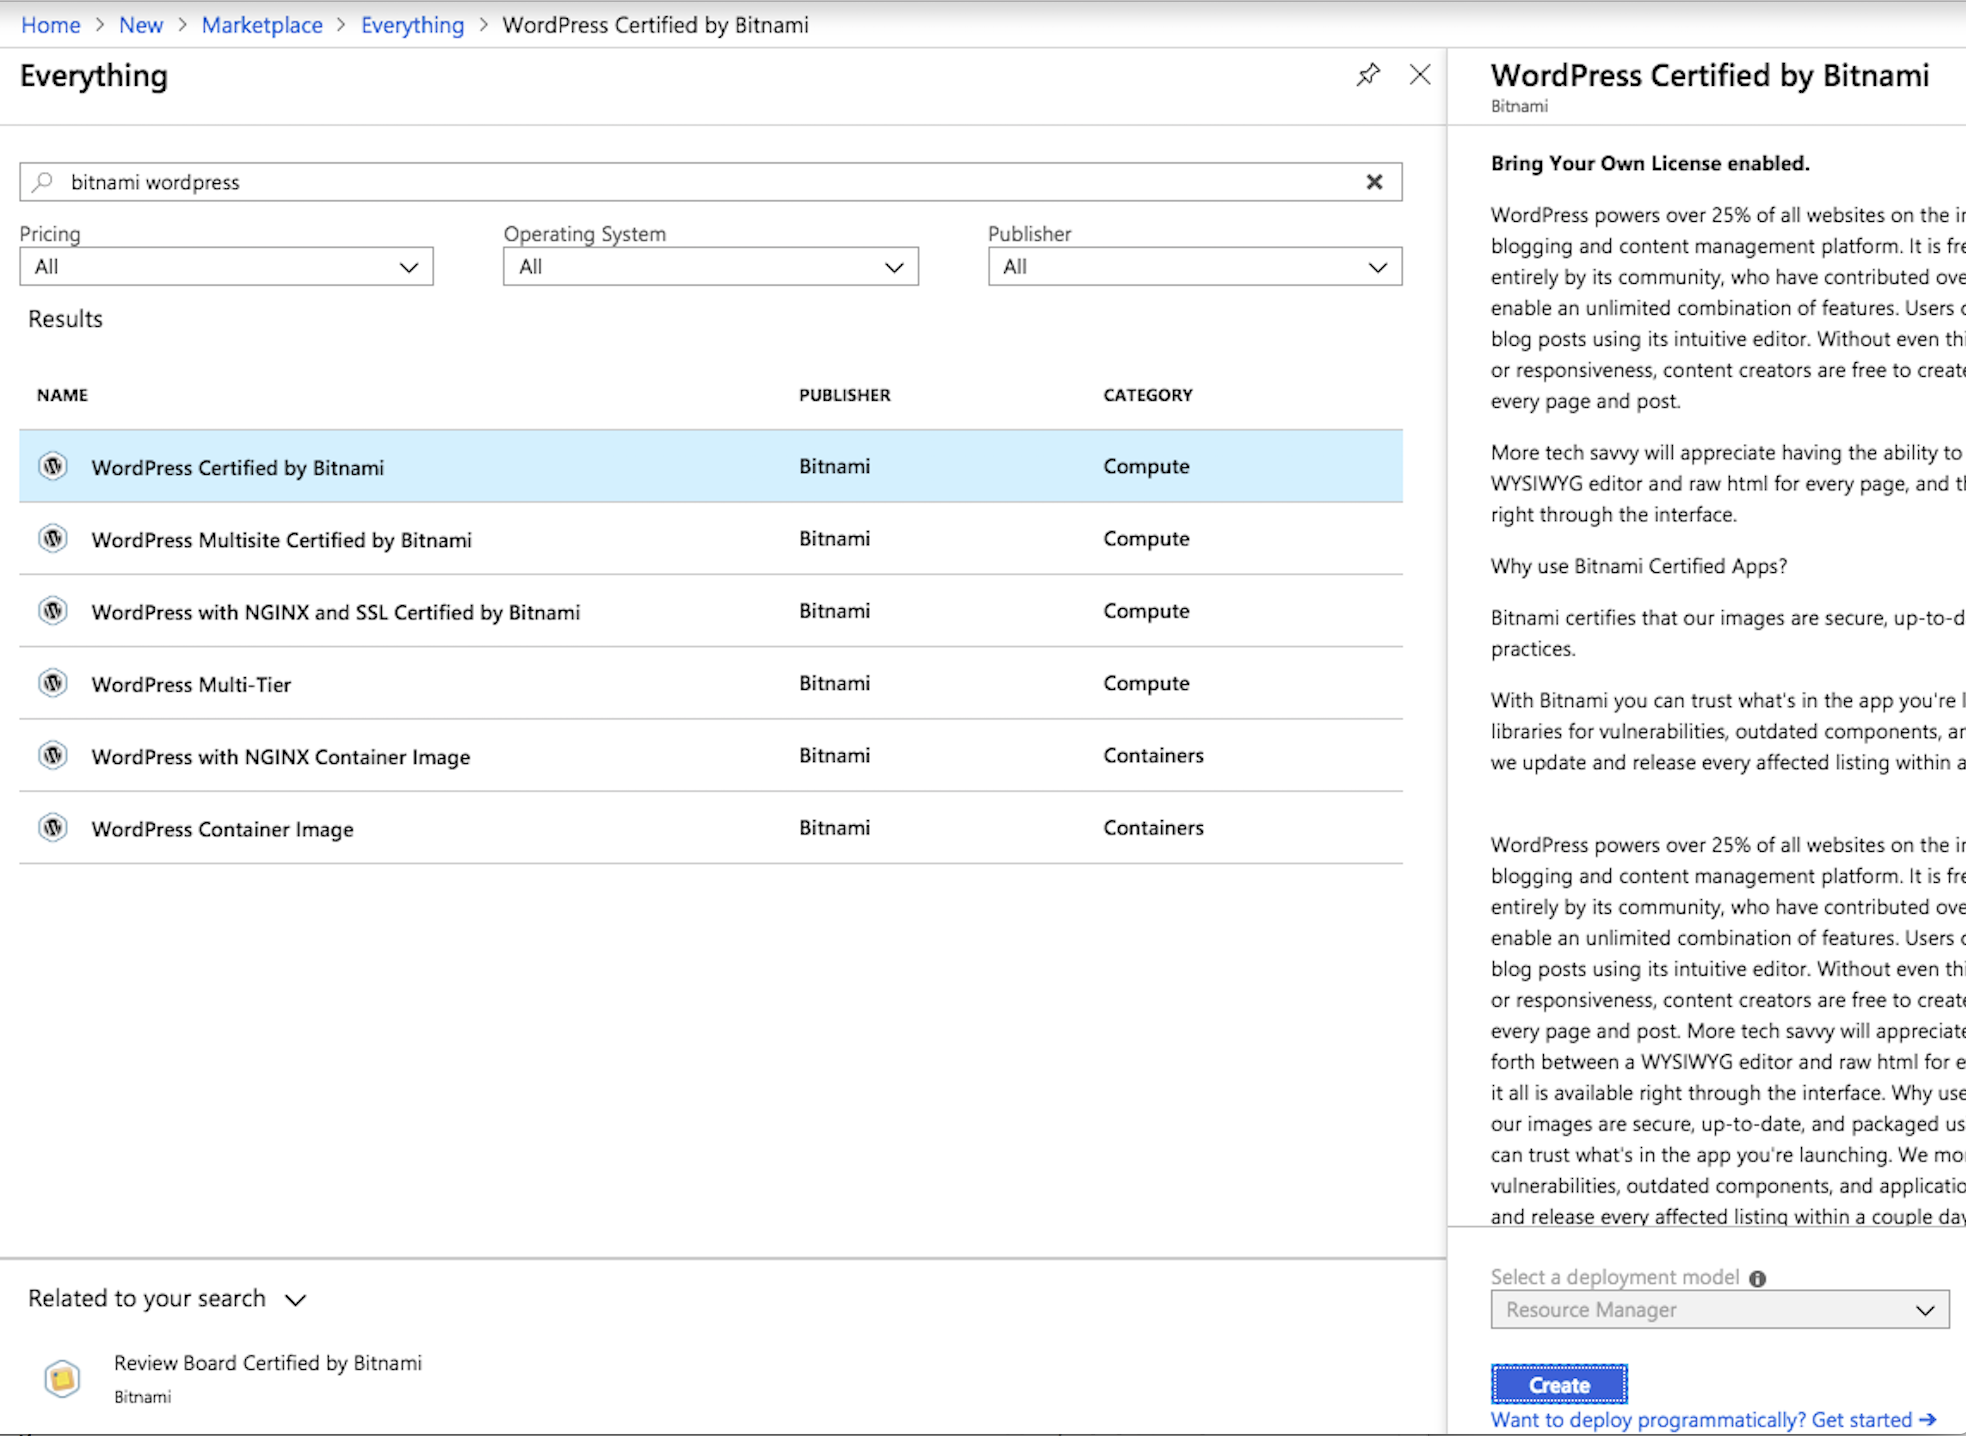
Click on Create at the bottom of the screen
Use the information in Table 2.2 to complete the “Basics” configuration page during this deployment.
Table 2.2
Key Value Resource Group Use existing: student##-rg Virtual machine name student##-wp Region <Closest Azure DC> Size Change: Basic A1 Authentication type Password Username azureuser Password ChangeMeNow123 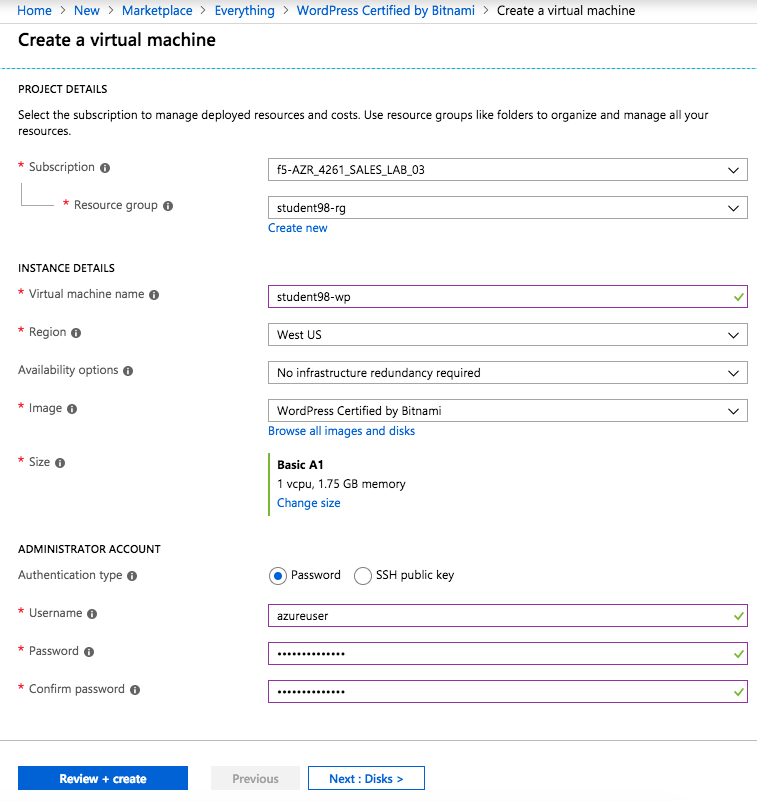
Click Review + create at the bottom of the page
Supply your email and phone number for validation
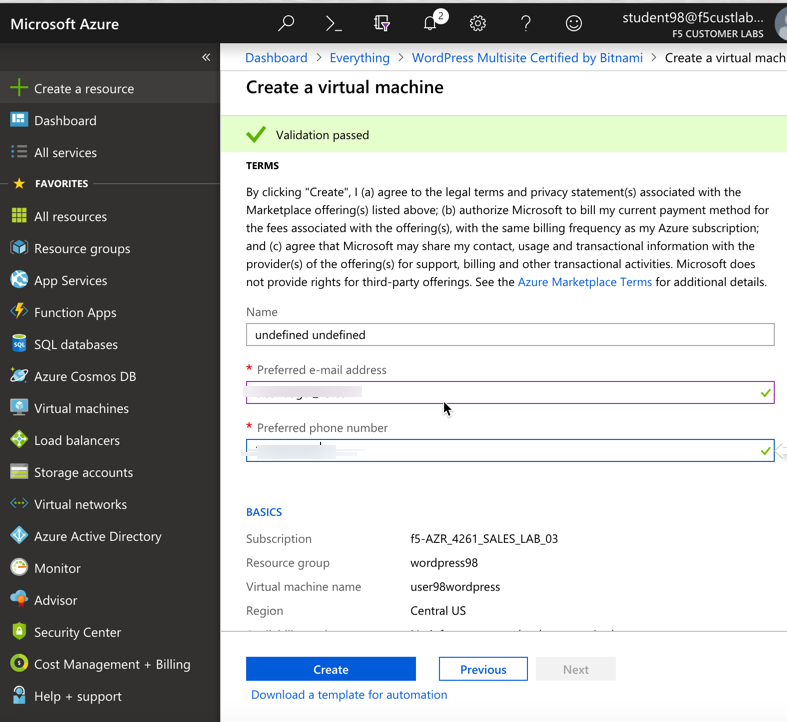
Click Purchase or Create. You will receive status “Deployment underway”. Continue on after receiving “Your deployment is complete”.
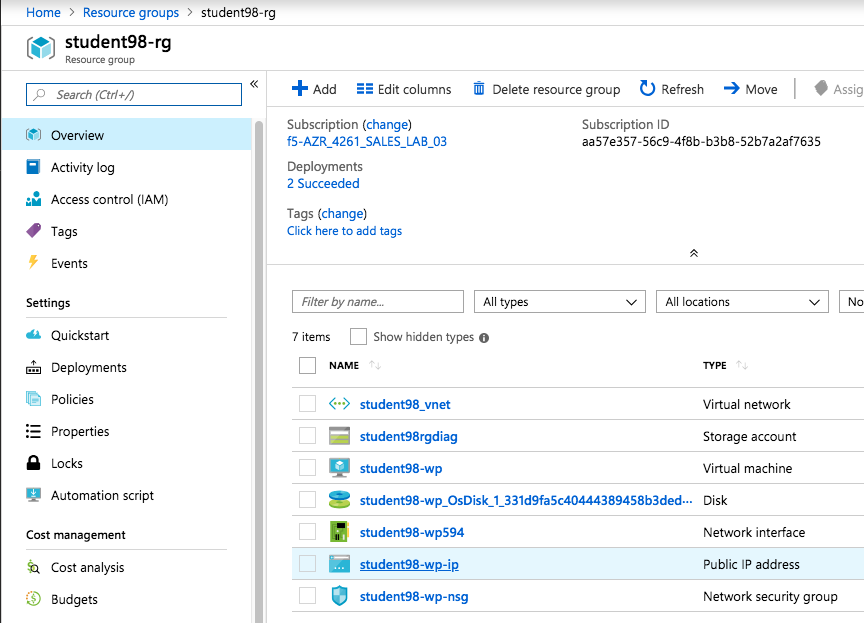
Go to Resource groups and click on your resource group
Select your WordPress “Public IP address”
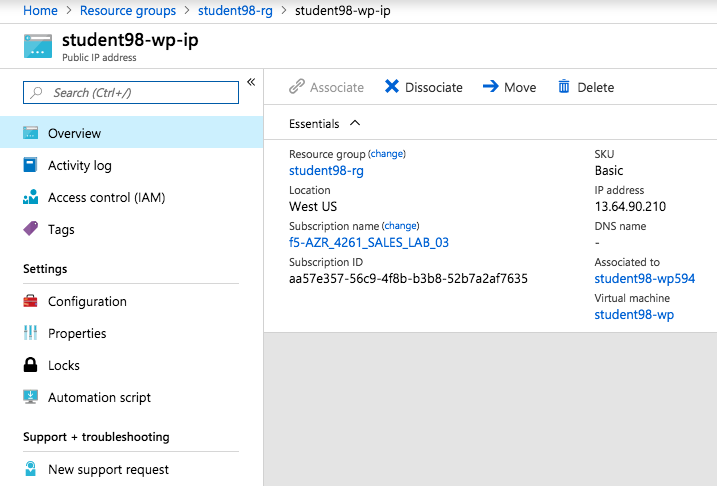
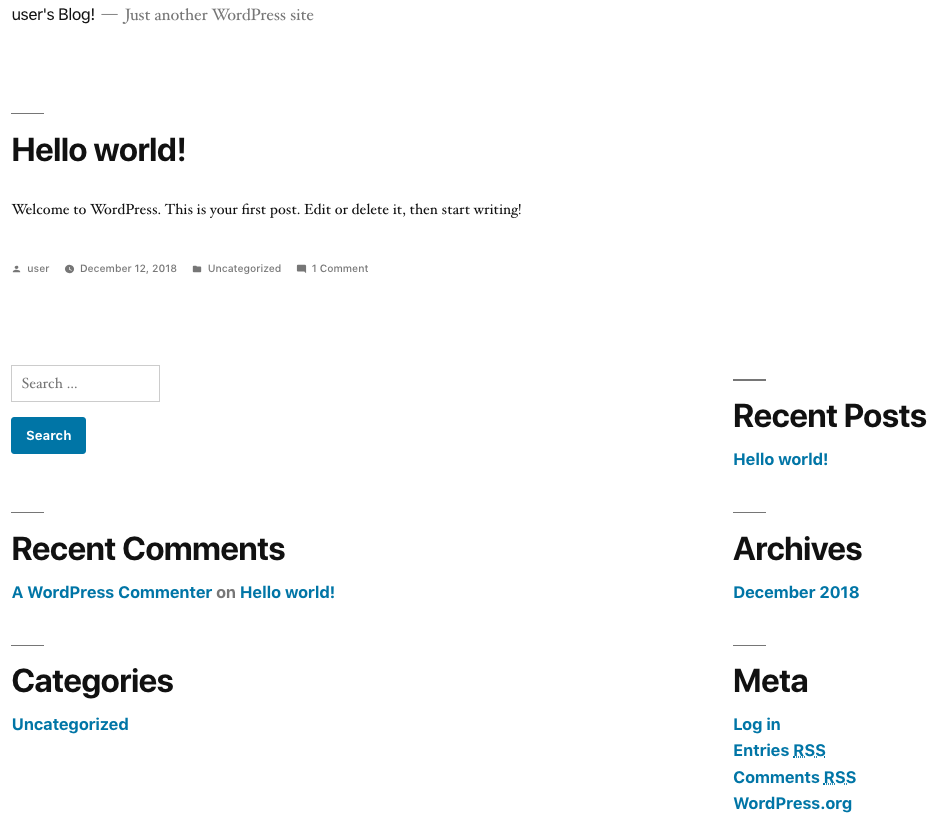
Verify that https://<WordPress-Public-IP> displays the Wordpress blog
- You may have to accept the security warning
Note
Remember the WordPress public IP address. This will be used in subsequent steps. This can take 10min before page loads.
2.1.3. Task – Deploy a new F5 BIG-IP VE in Azure
In this task you will deploy a virtual machine and install the BIG-IP.
Click the green + Create a resource sign at the top left corner of the screen
Search the marketplace by typing ‘F5 Better’ in the search field and hit Enter. Take your time to view the different F5 products available.
Click F5 BIG-IP Virtual Edition - BETTER (PAYG, 25Mbps)
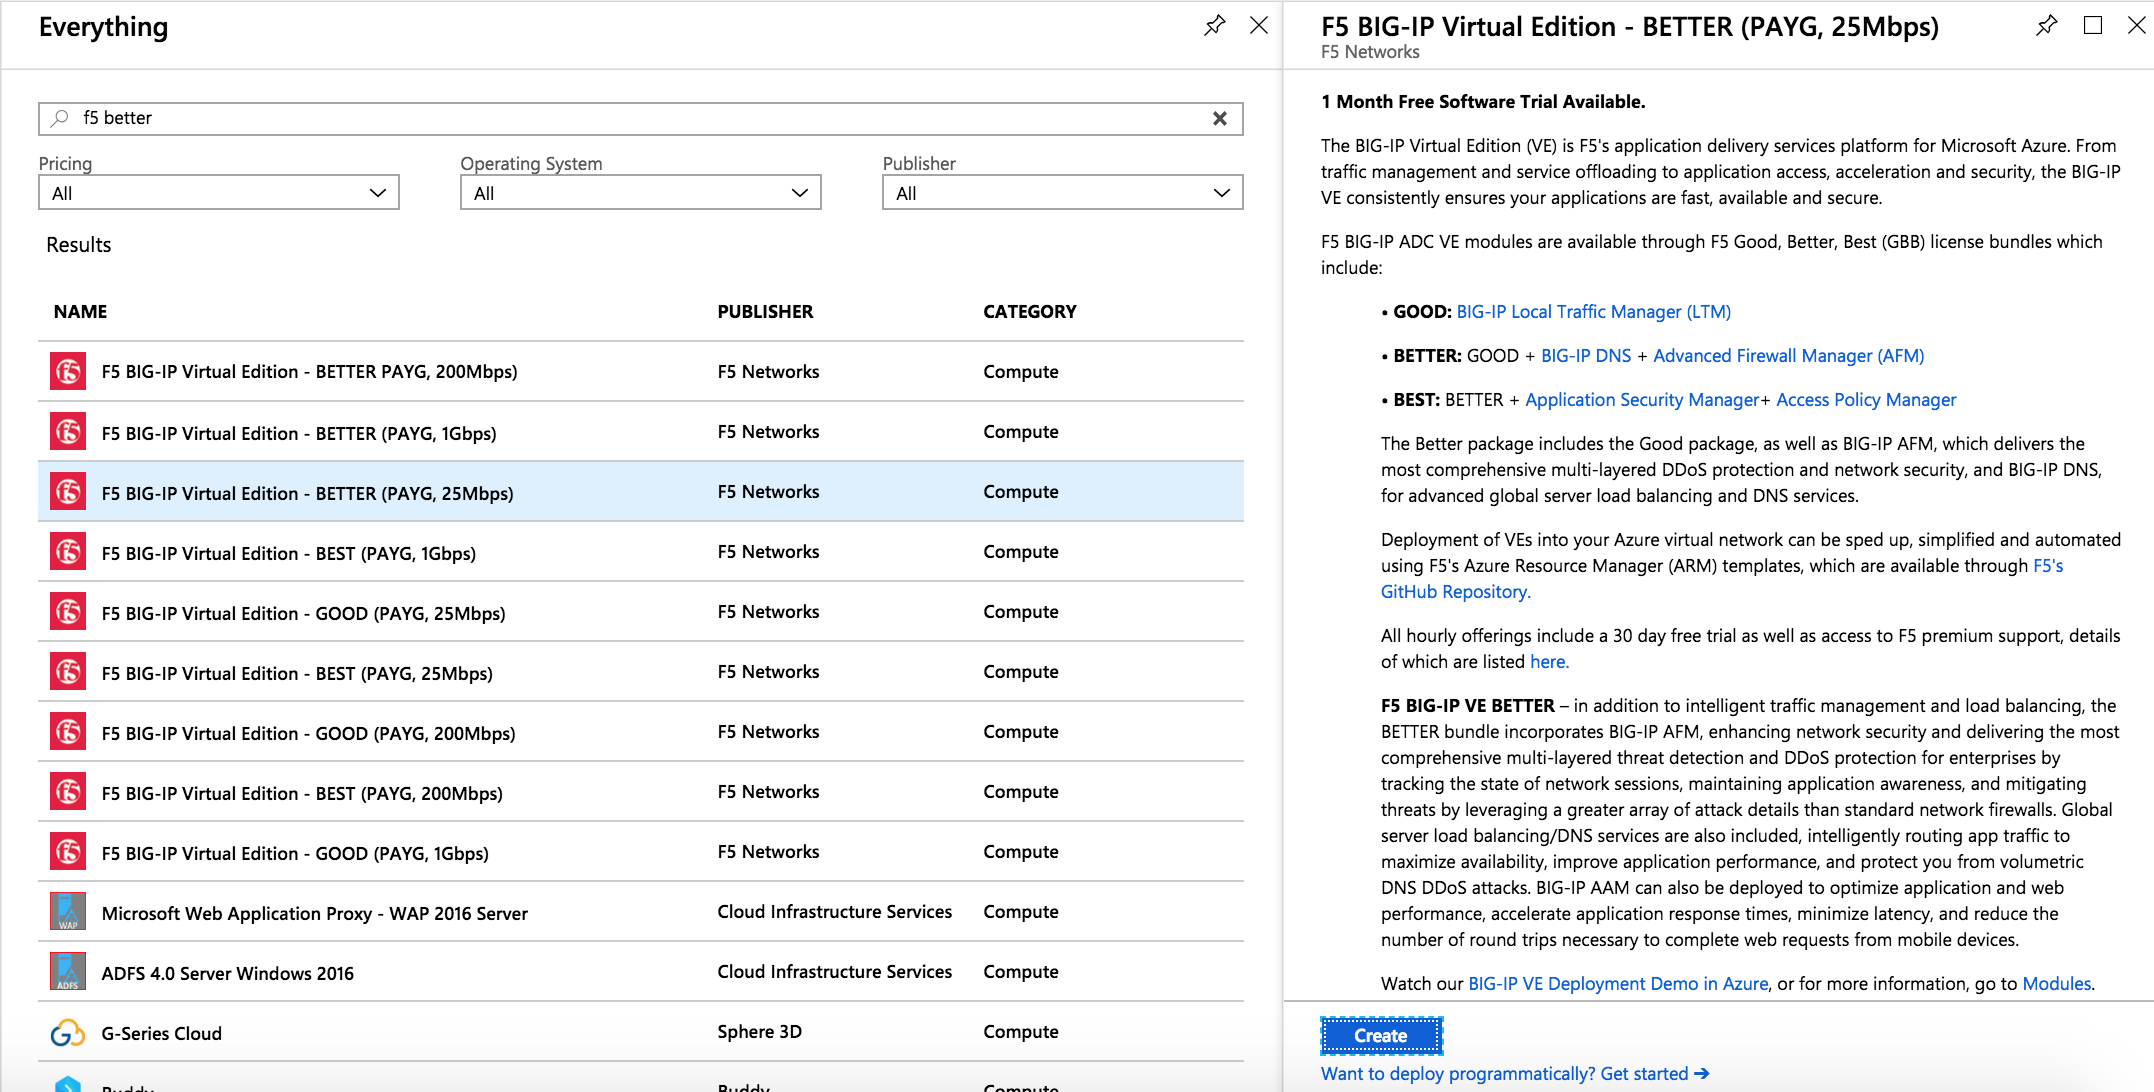
Note
All hourly offerings include a 30 day free trial as well as access to F5 premium support.
Click Create
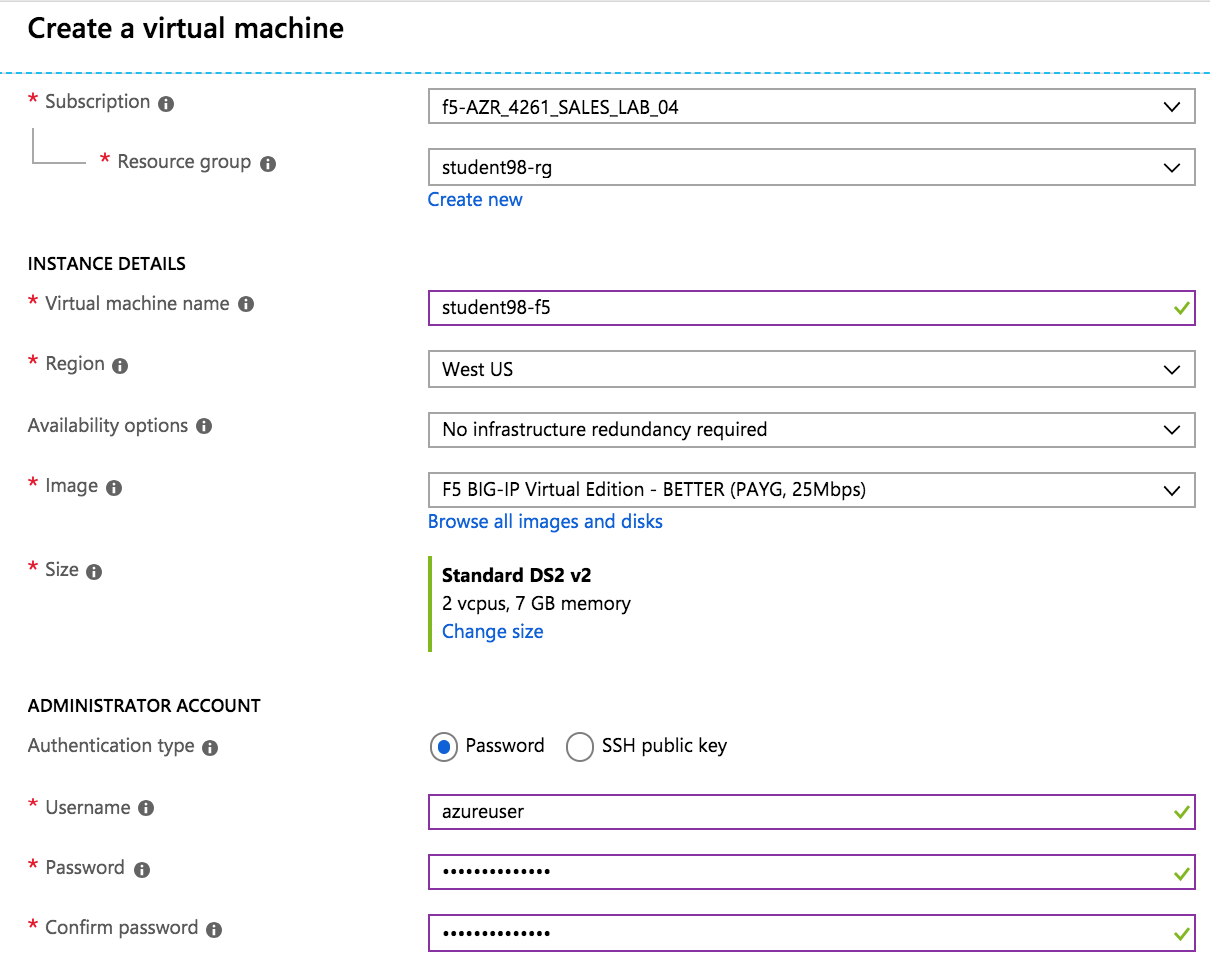
You will now start the deployment process. Use the information provided in Table 1.1 below to complete the “Create virtual machine” Basics page.
Table 1.1
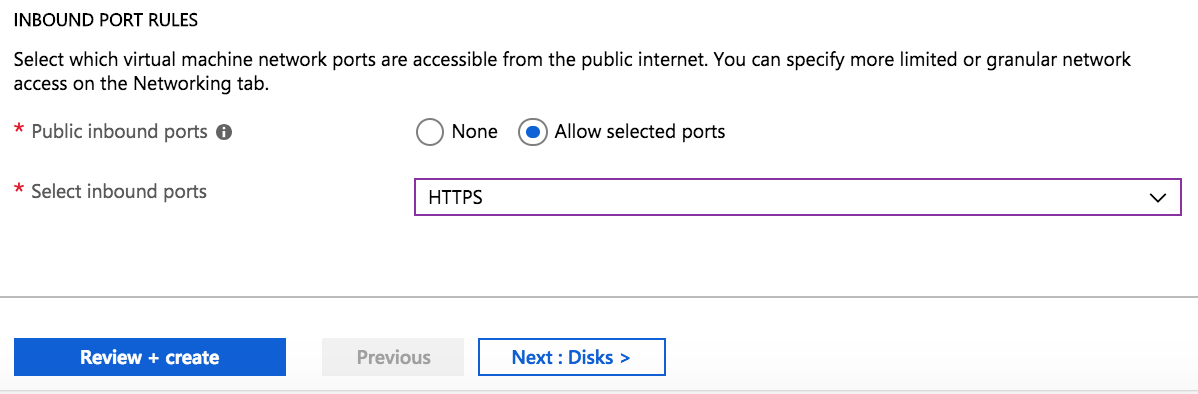
Key Value Resource Group Use existing: student##-rg Virtual machine name student##-f5 Region <Closest Azure DC> Size Change: Standard DS2_v2 Authentication type Password Username azureuser Password ChangeMeNow123 Public inbound ports Allow selected ports Selected inbound ports HTTPS, SSH Example:
Click Review + Create
Review the “Summary” page and the purchase you are about to make
Supply your email and phone number for validation
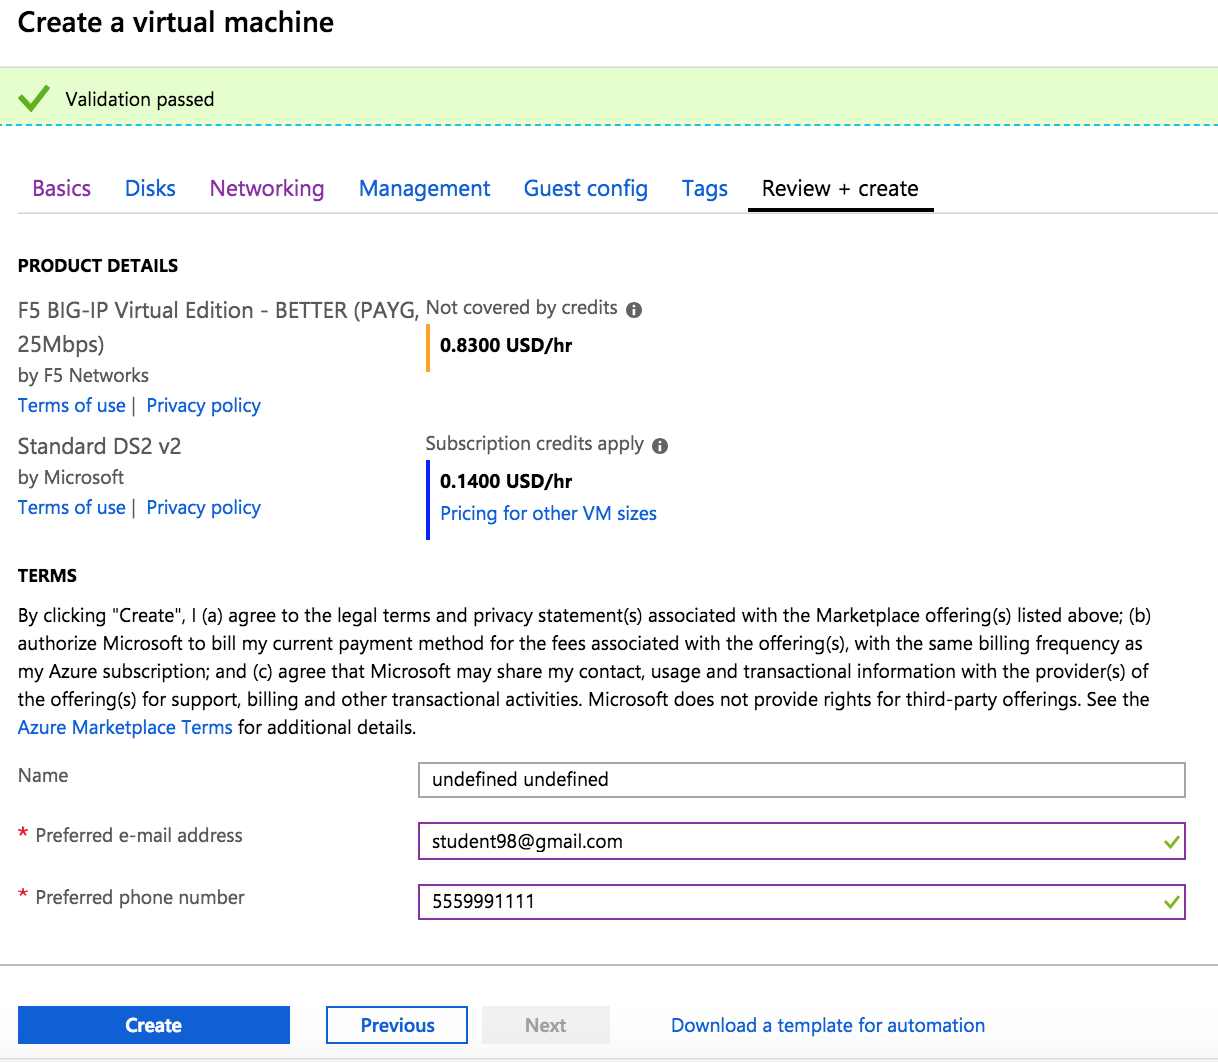
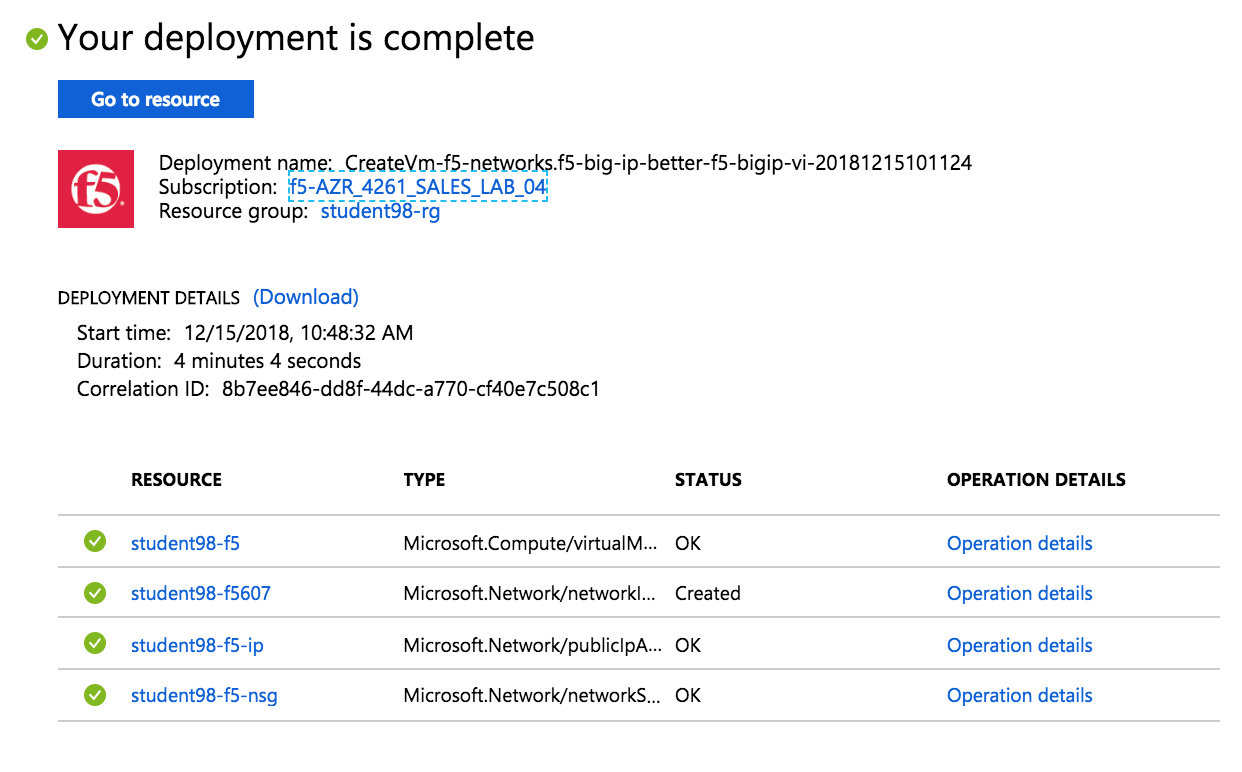
Click Create. You will receive status “Deployment underway”. Continue on after receiving “Your deployment is complete”.
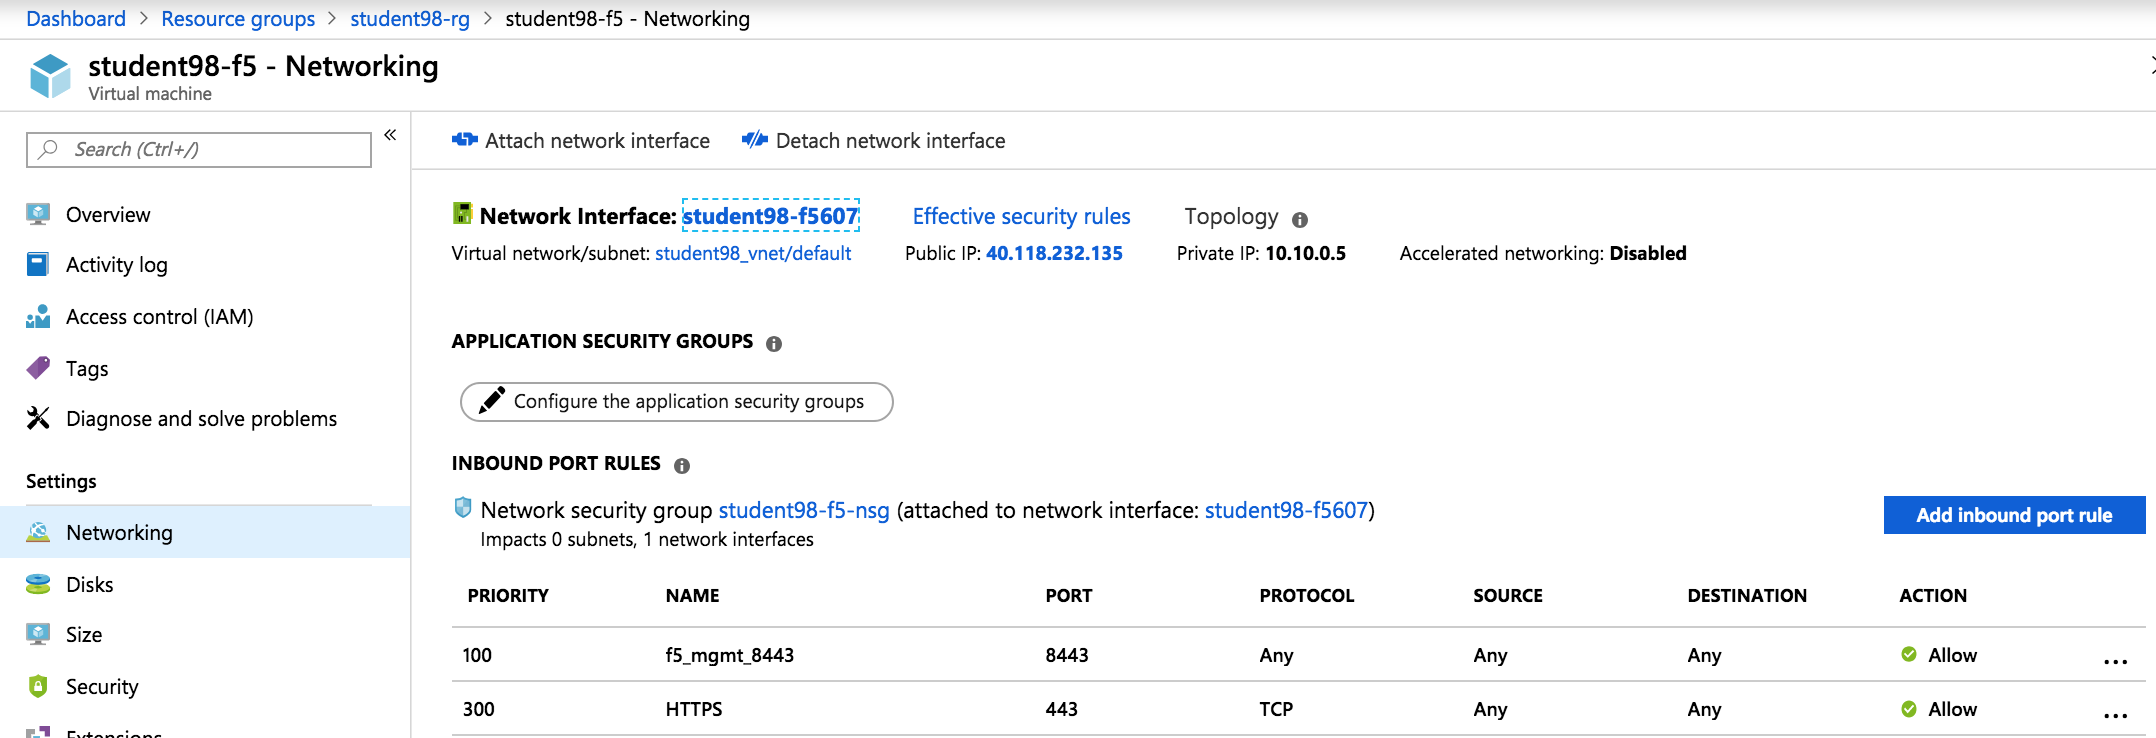
2.1.4. Task – Allow management and HTTPS access to the BIG-IP
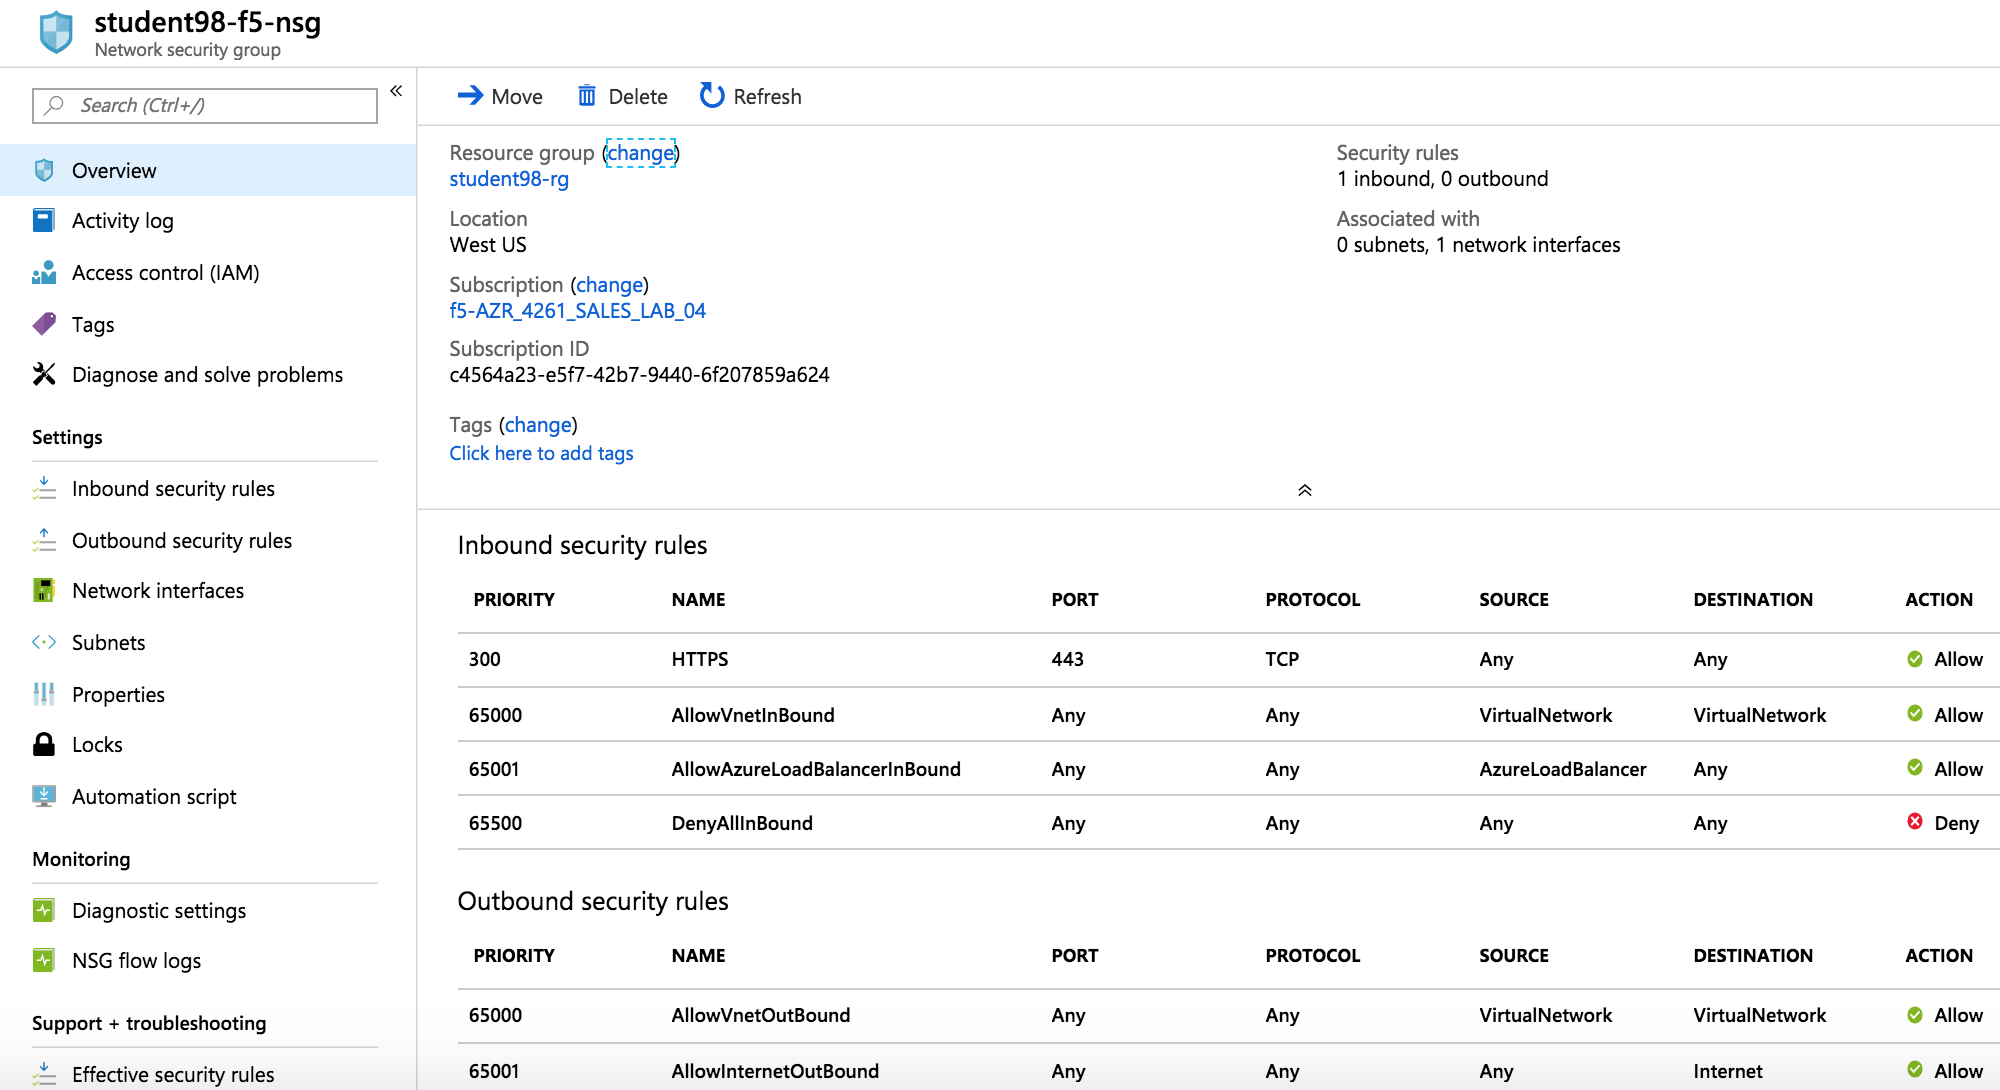
In this task you will permit management access and HTTPS access to the BIG-IP by modifying the Network Security Group “Inbound” network access rule set.
Select the student##-f5-nsg Network security group
Review the existing ruleset. Notice the default inbound rules and HTTPS selected during an earlier step.
Now you will add rules to allow HTTPS on port 8443 for F5 BIG-IP management by clicking on “Inbound security rules” (to the left of the screen below).
Click Inbound security rules
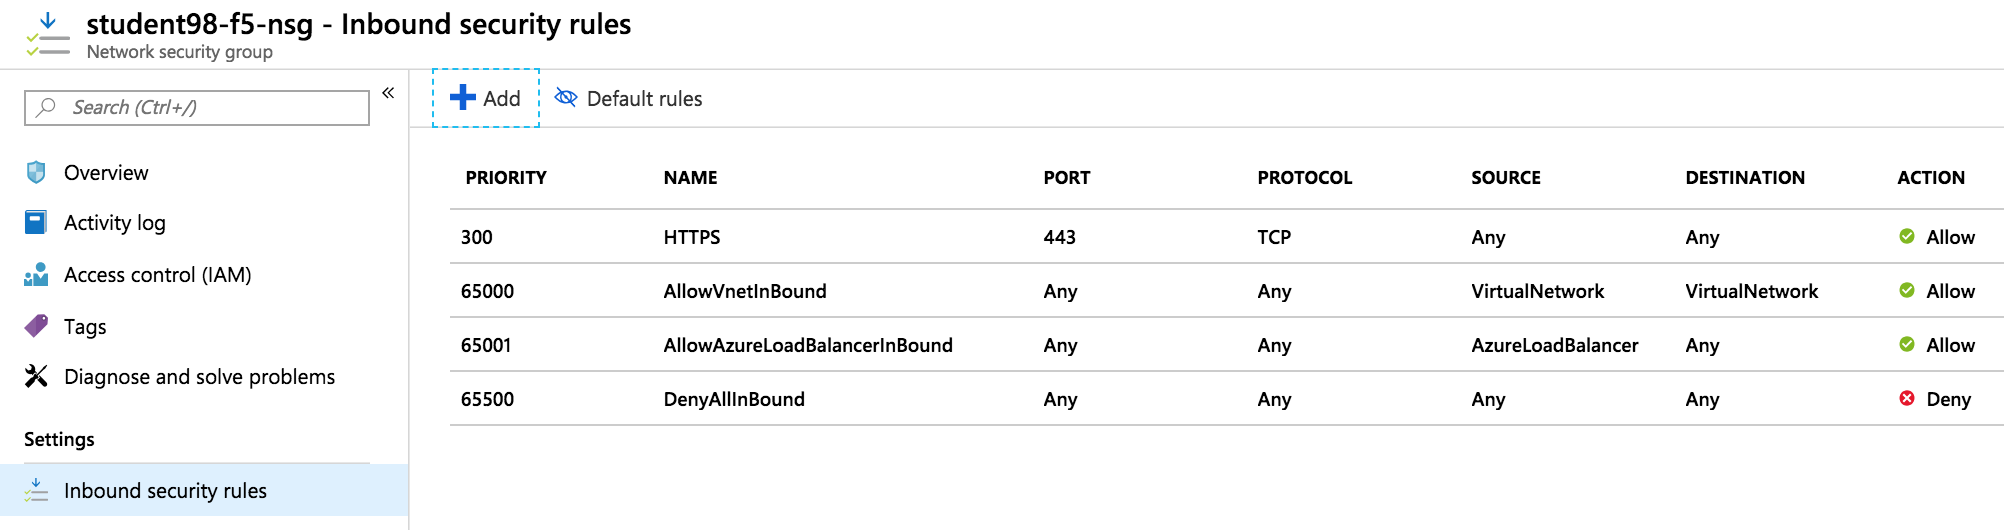
Click + Add
Using the information provided in Table 1.4, add a rule to allow F5 BIG-IP management traffic.
Table 1.4
Key Value Source Any Source Port * Destination Any Destination Port 8443 Protocol Any Action Allow Priority 100 Name f5_mgmt_8443 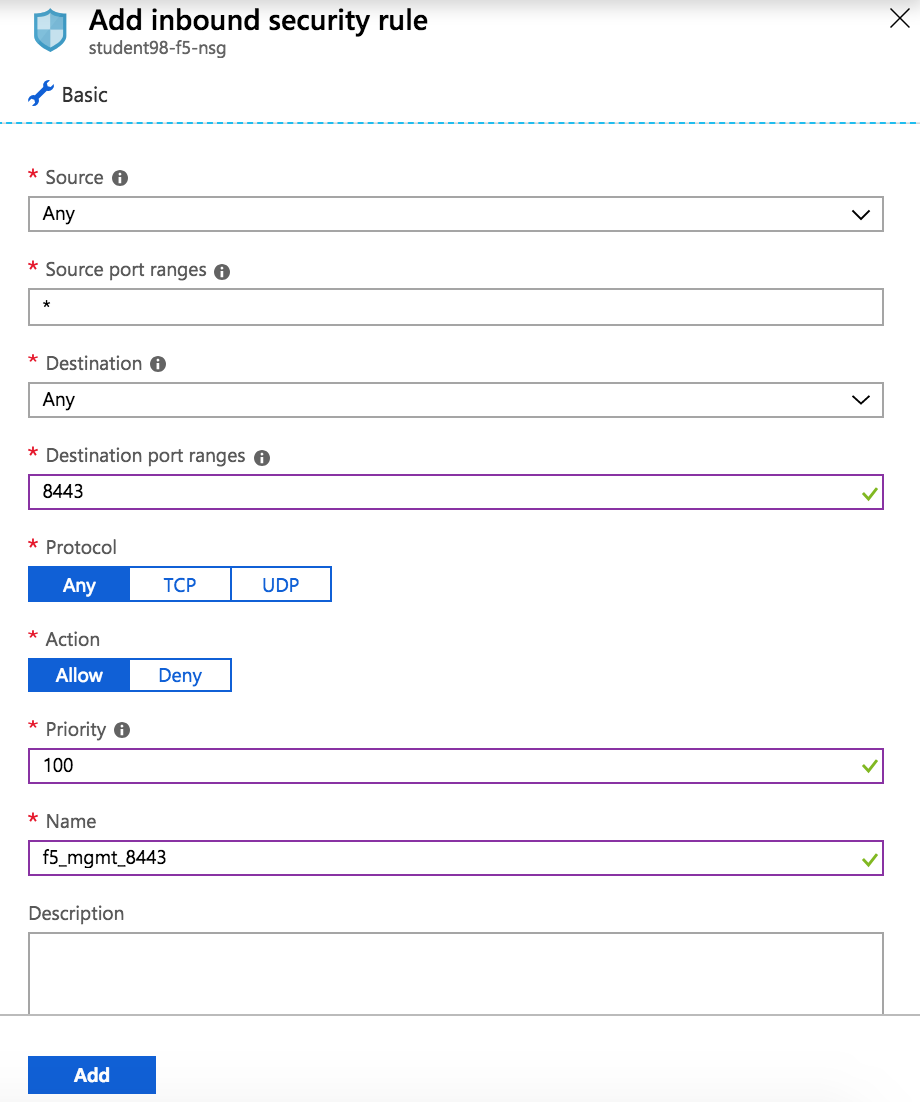
Click Add
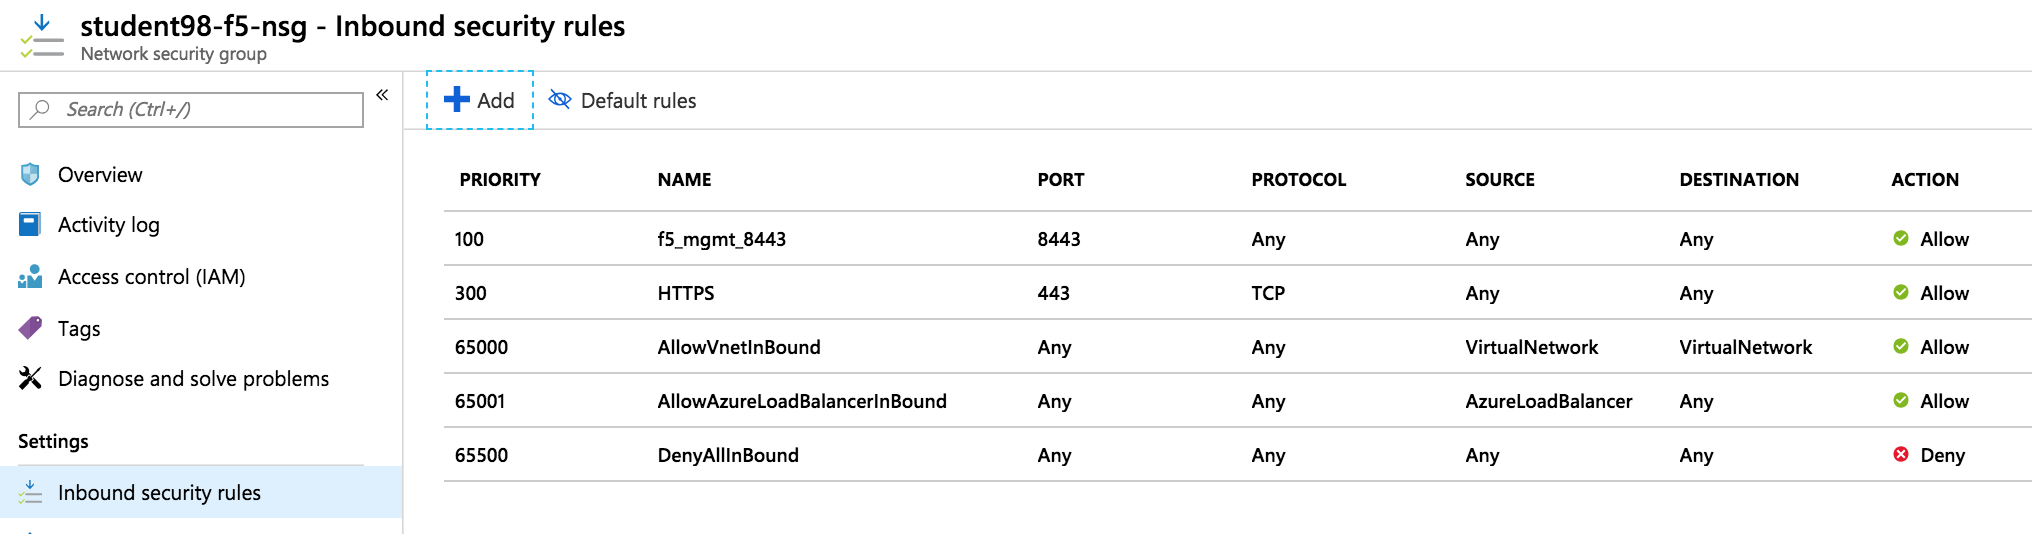
When complete, verify the end results look as follows:
Select Resource Group > student##-rg > student##-f5 then networking to view public and private address of the F5 BIG-IP virtual machine.
Connect to the F5 GUI by going to https://<F5-BIG-IP-public-IP>:443
Accept the SSL certificate warning
Log into the BIG-IP using the credentials configured in the previous steps Username: azureuser Password: ChangeMeNow123
Click Next on Setup Utility
Click Next on Setup Utility -> License
Click Next on Setup Utility -> Resource Provisioning
Click Next on Setup Utility -> Device Certificates
Enter Hostname and Password using info below then click Next
Table 1.5
Key Value Hostname student.f5demo.com Password ChangeMeNow123 Click Finished on Setup Utility -> Network
SSH azureuser@<F5-BIG-IP-public-IP> and enter password
Type modify sys httpd ssl-port 8443
Type modify net self-allow defaults add { tcp:8443 }
Type modify net self-allow defaults delete { tcp:443 }
Type save sys config
Reconnect to the F5 GUI by going to https://<F5-BIG-IP-public-IP>:8443
2.1.5. Task – Allow Internet access to WordPress through the BIG-IP
In this task you will configure the BIG-IP with a Virtual Server and Pool to allow inbound Internet access to the WordPress application. First we need to identify the private IP address for the WordPress instance. Let’s go back to the Microsoft Azure Portal.
Select Resource Group > student##-rg > student##-wp then networking to view public and private address of the F5 BIG-IP virtual machine.
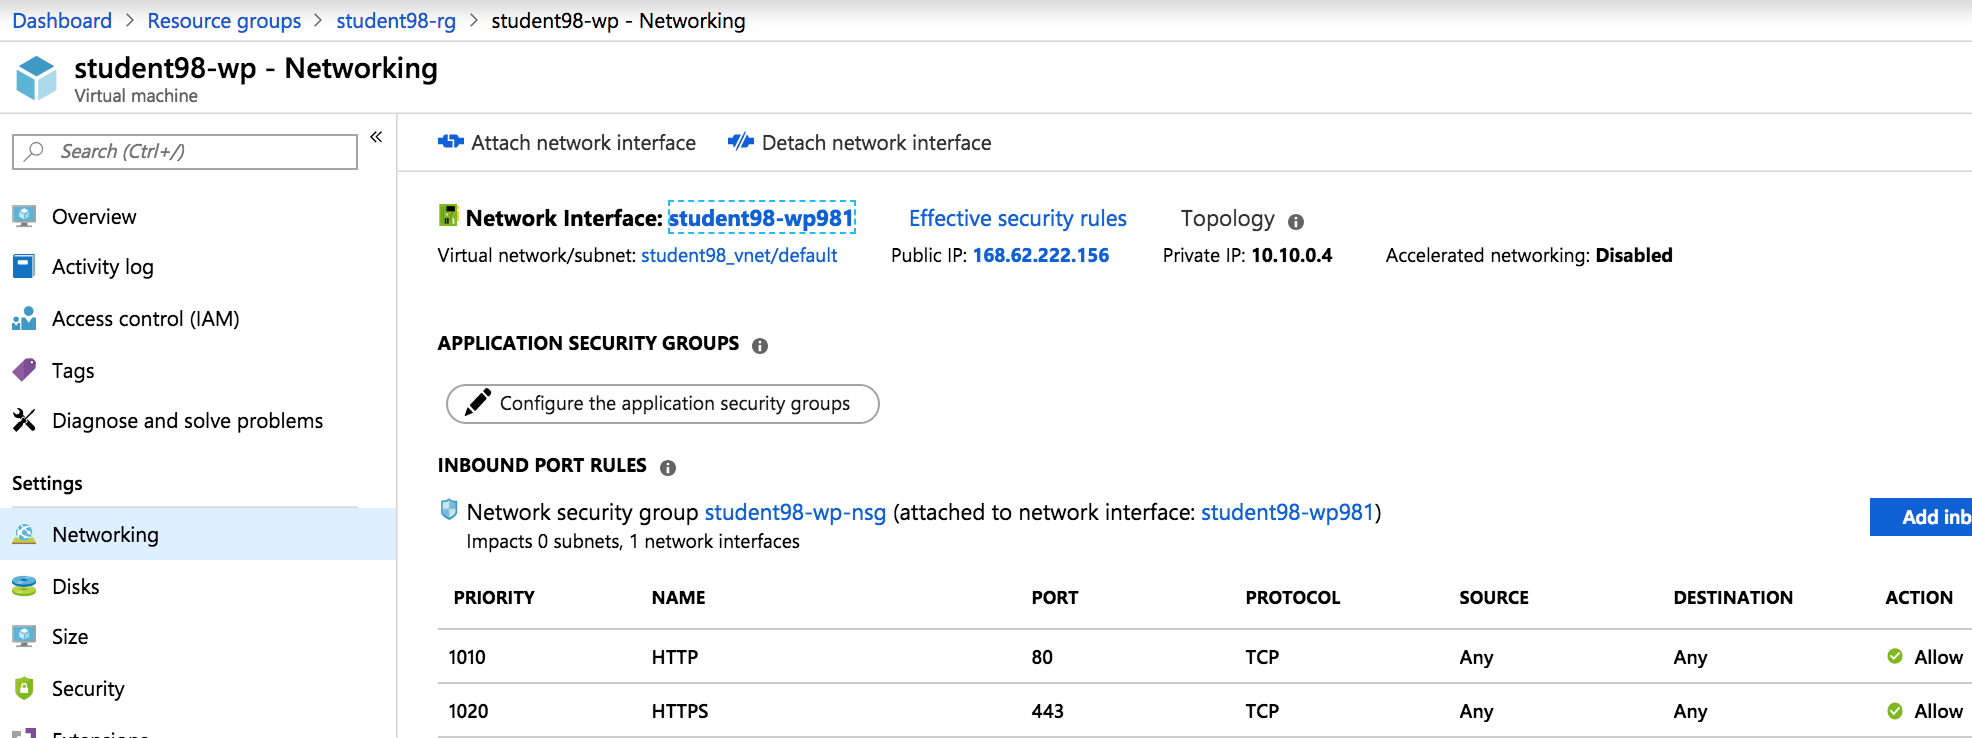
Note
Remember WordPress private IP address. This will be used in subsequent steps.
Connect to the BIG-IP using https://<F5-public-IP>:8443
From the BIG-IP GUI, go to Local traffic -> Pools -> Pool List and click on the + sign. Configure the pool using the information provided in Table 1.8 below leaving all other fields set to defaults.
Table 1.8
Key Value Name wordpress_pool Health Montitor HTTPS Node Name wordpress Address <your WordPress private IP address> Service Port 443 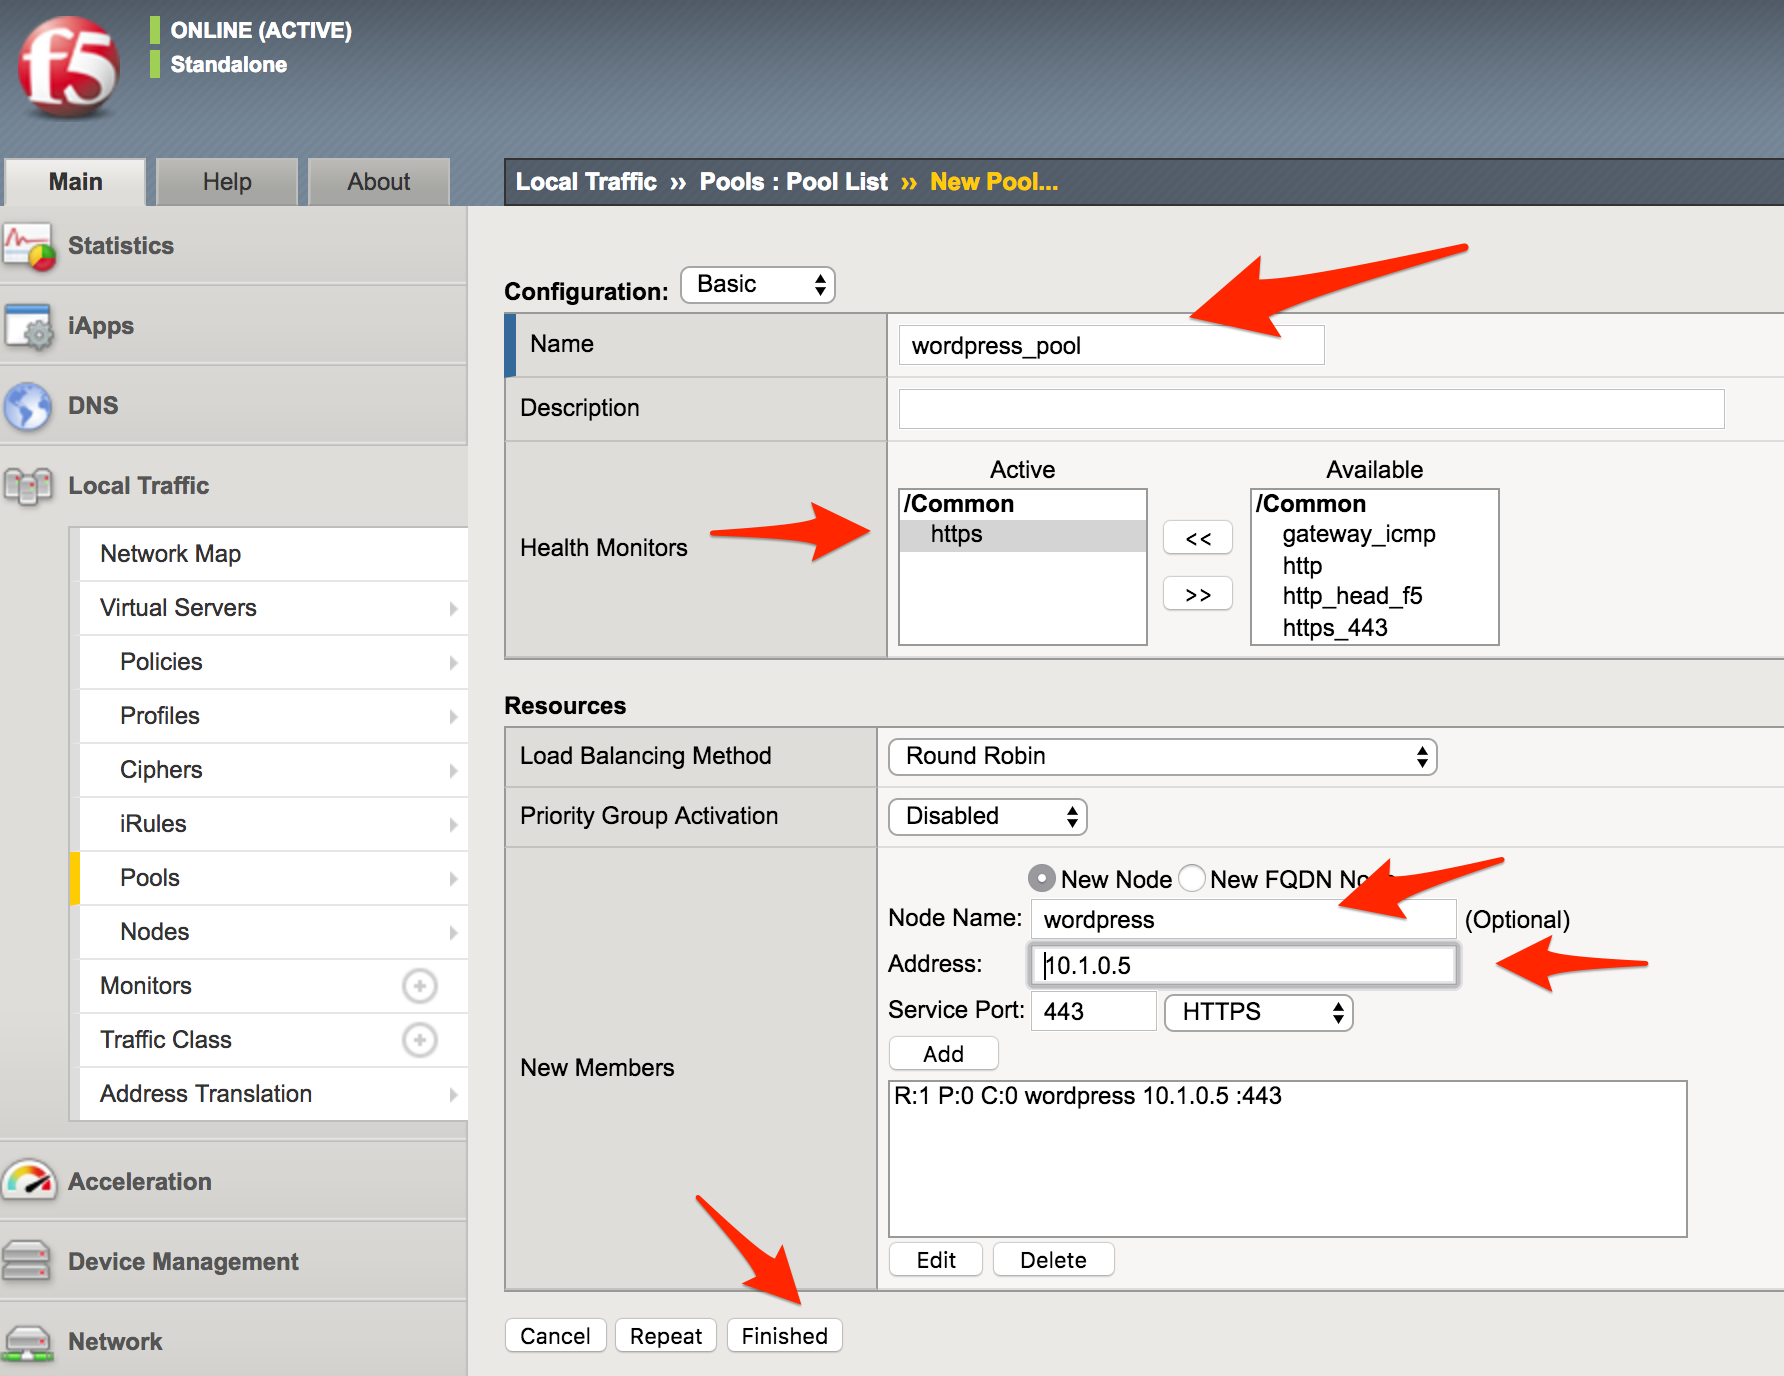
Click Finished. When configured correctly, the pool status will be green.

You now need to configure the Virtual server. To do this, you first need to find the private IP of your F5 BIG-IP.
From the BIG-IP GUI, go to Network -> Self IPs and note the IP Address
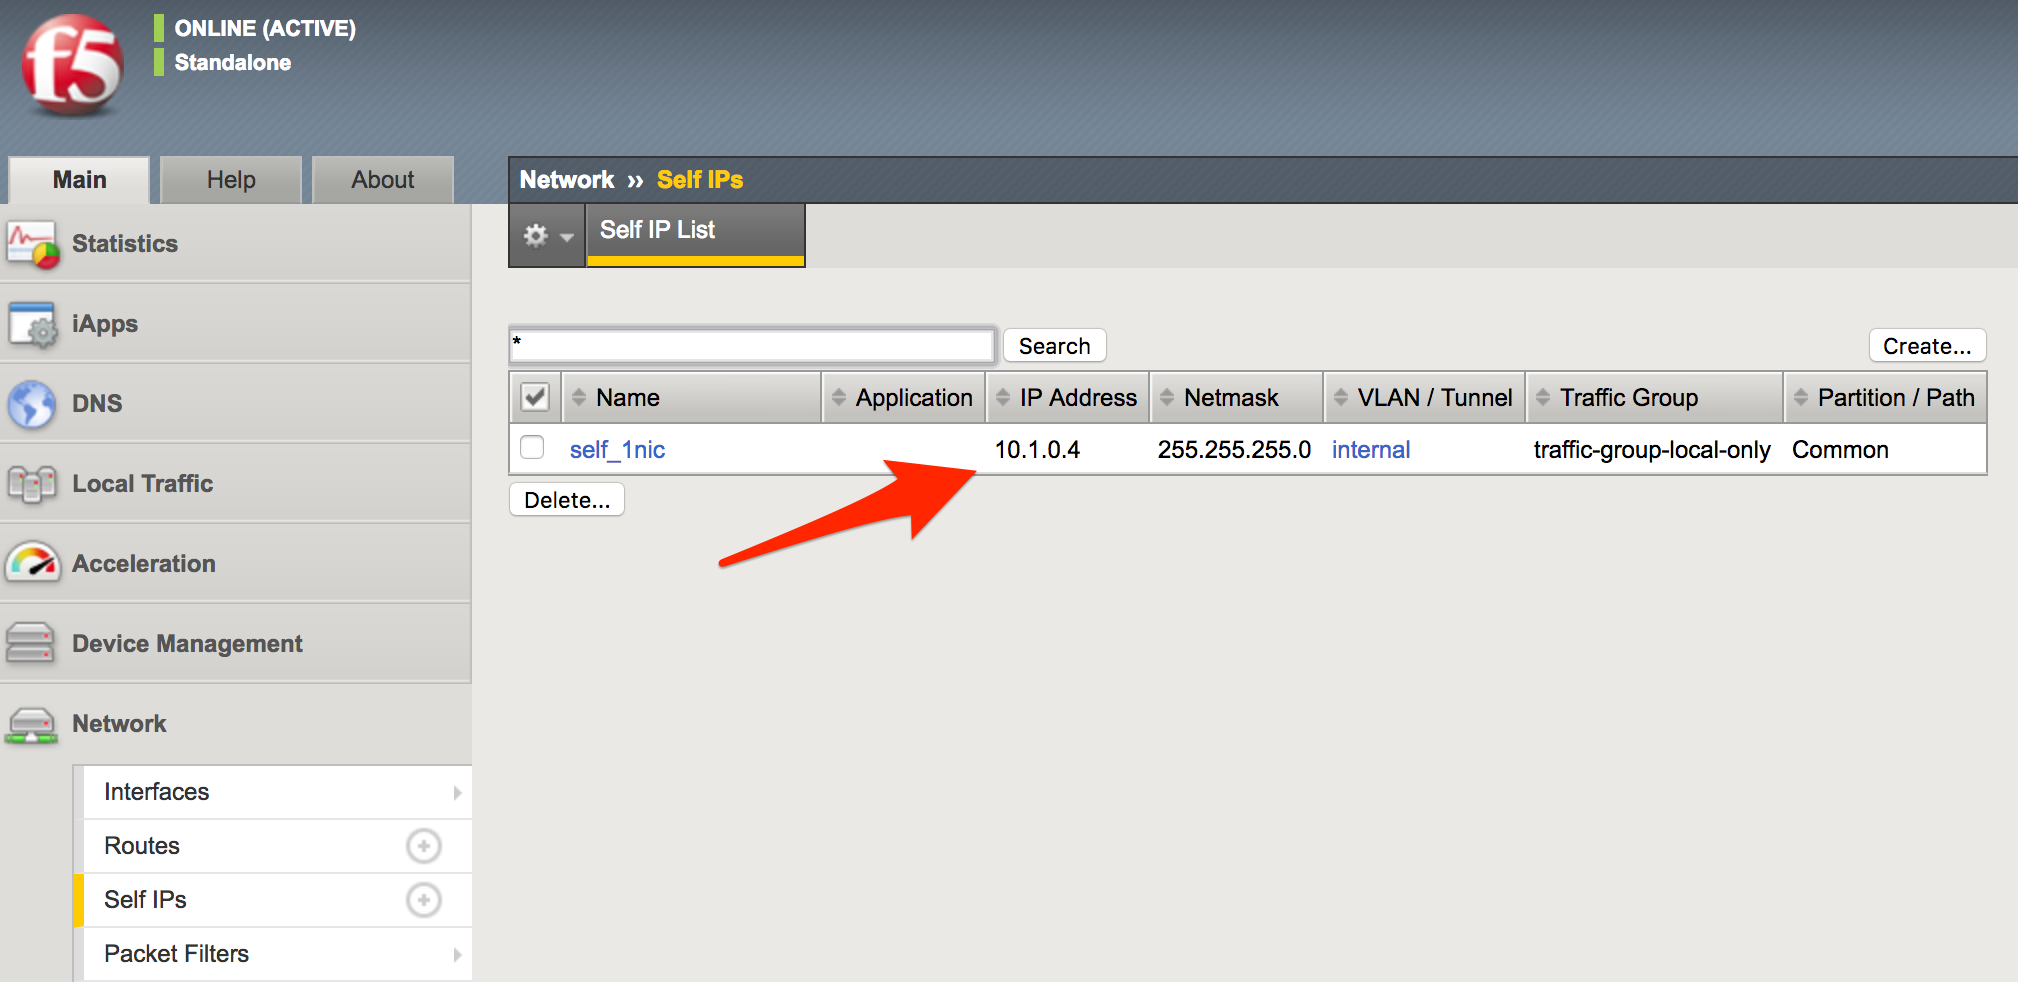
Create a virtual server by going to Local Traffic -> Virtual Servers -> Virtual Server List and click on the + sign. Configure the Virtual Server using the information provided in Table 1.9 below leaving all other fields set to defaults.
Table 1.9
Key Value Name vs_wordpress Destination Address <Self IP address of the BIG-IP> Service Port 443 SSL Profile (Client) clientssl SSL Profile (Server) serverssl Source Address Translation Auto Map Default Pool wordpress_pool 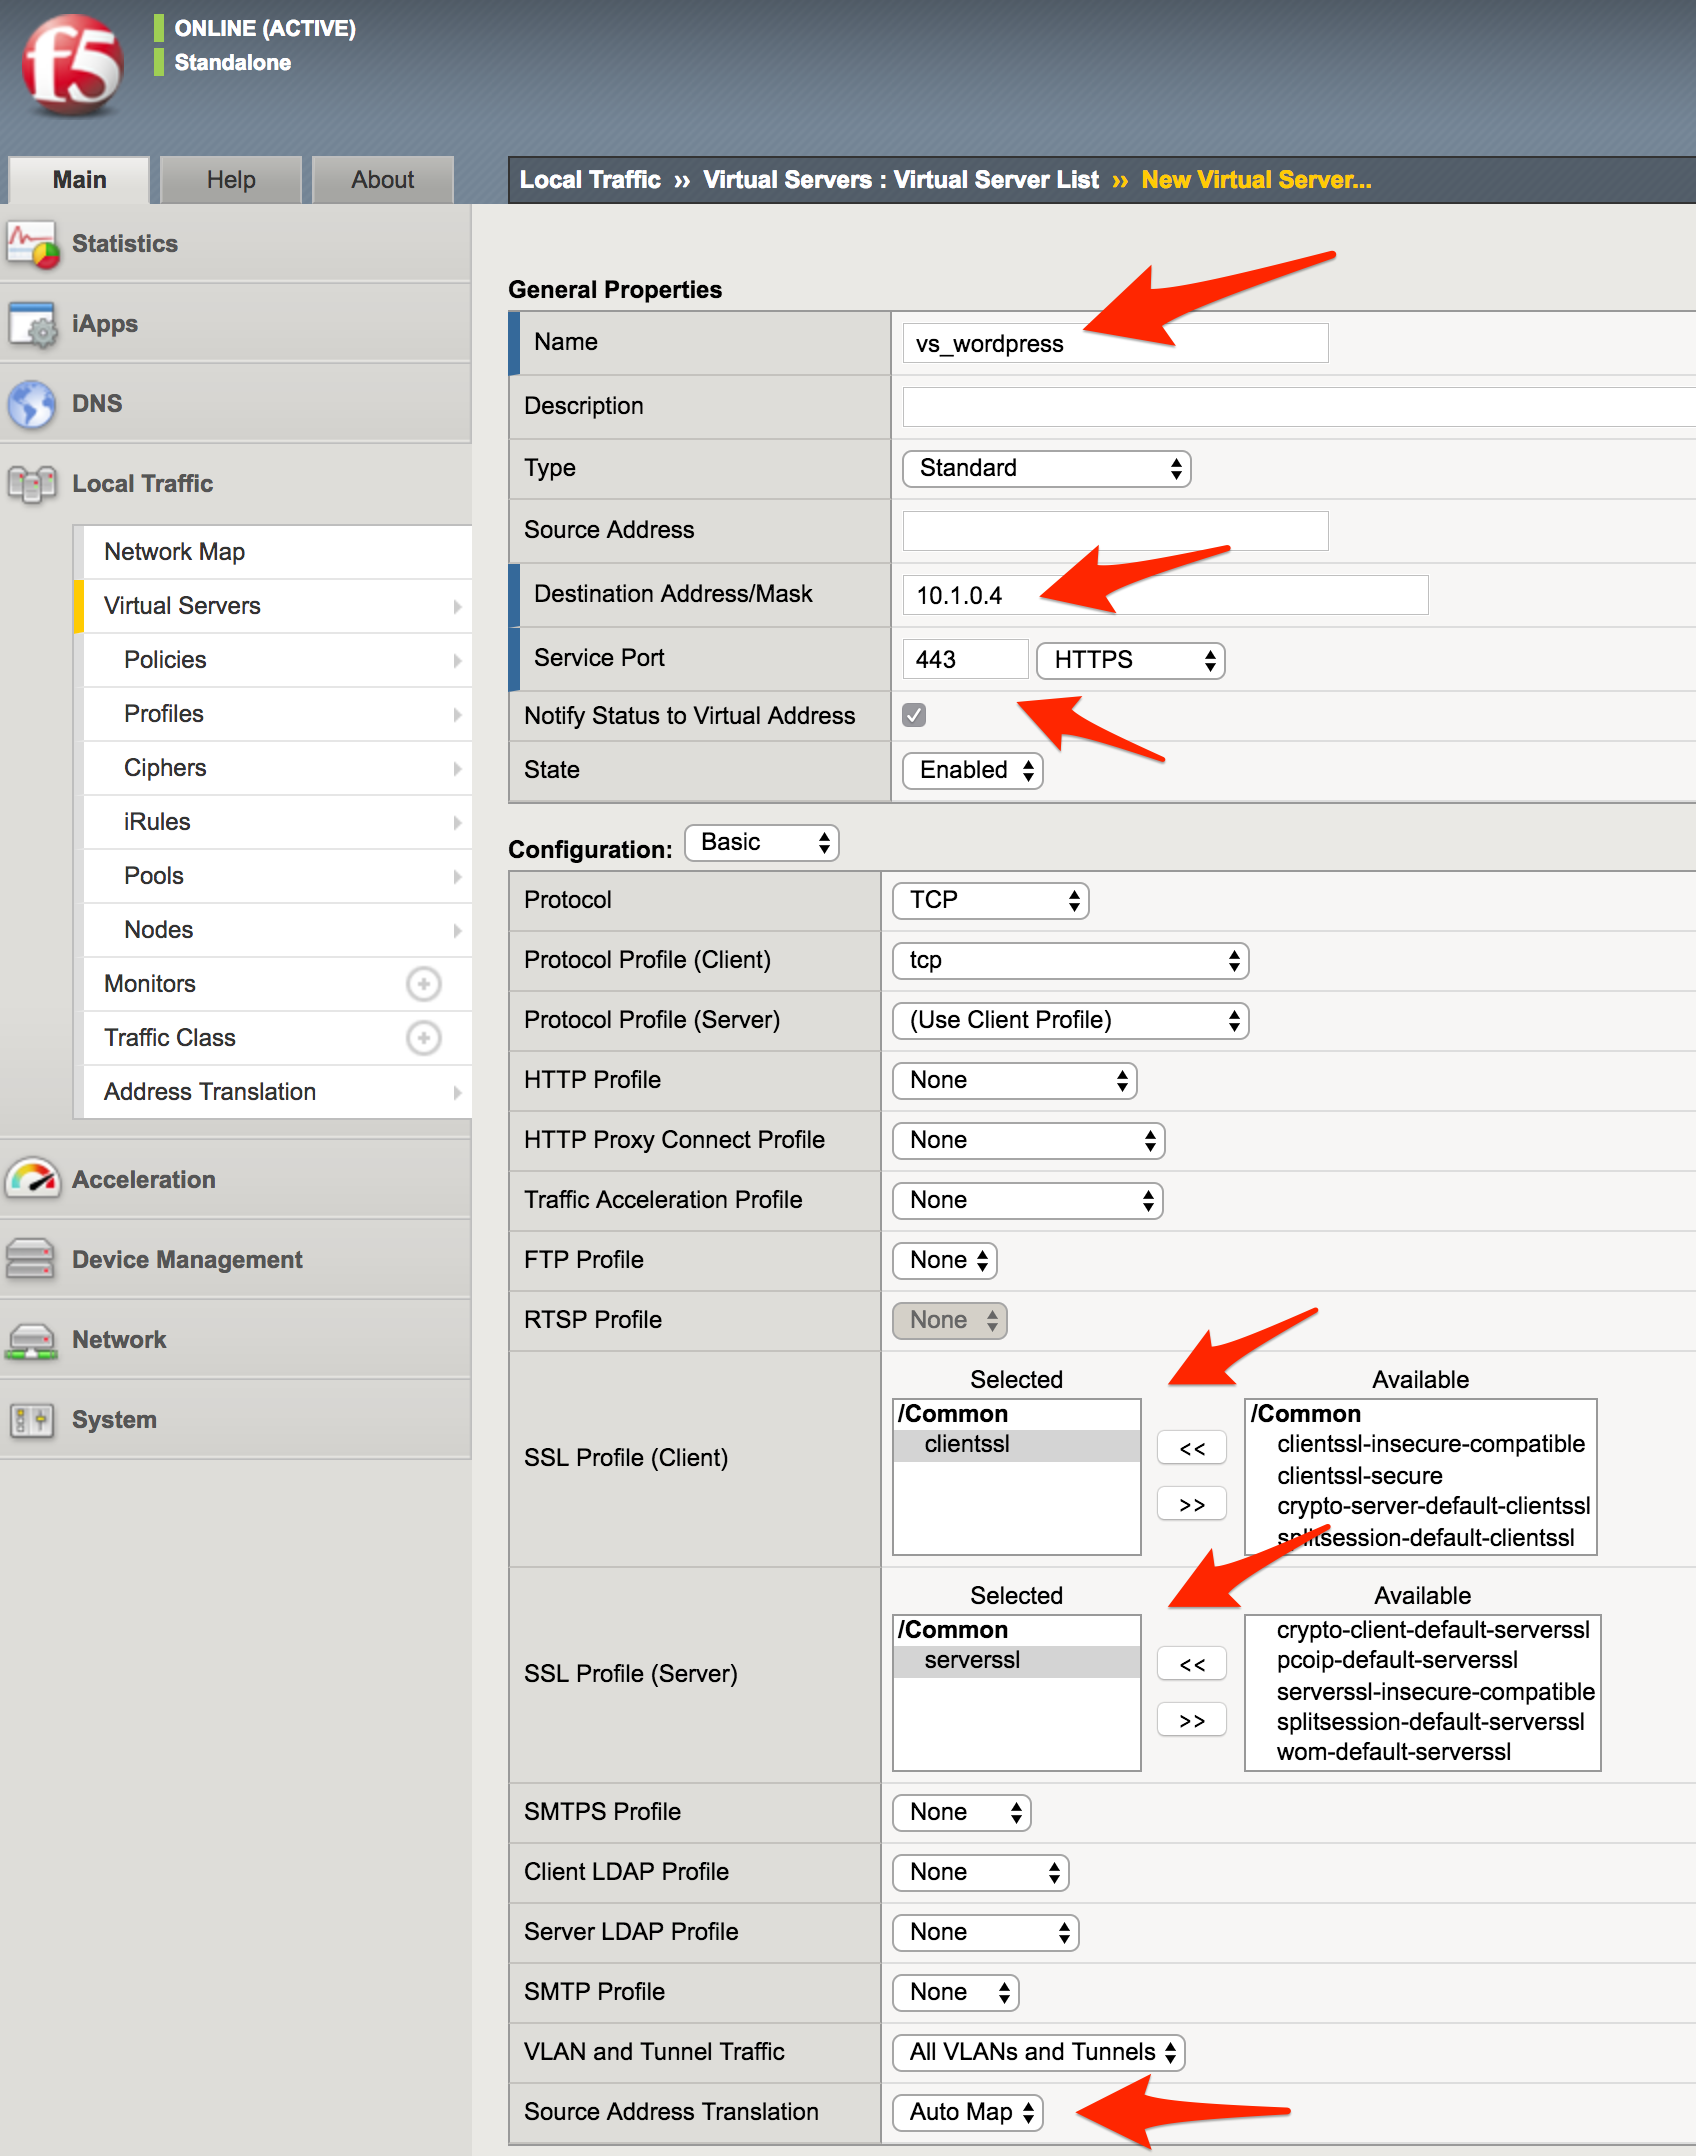
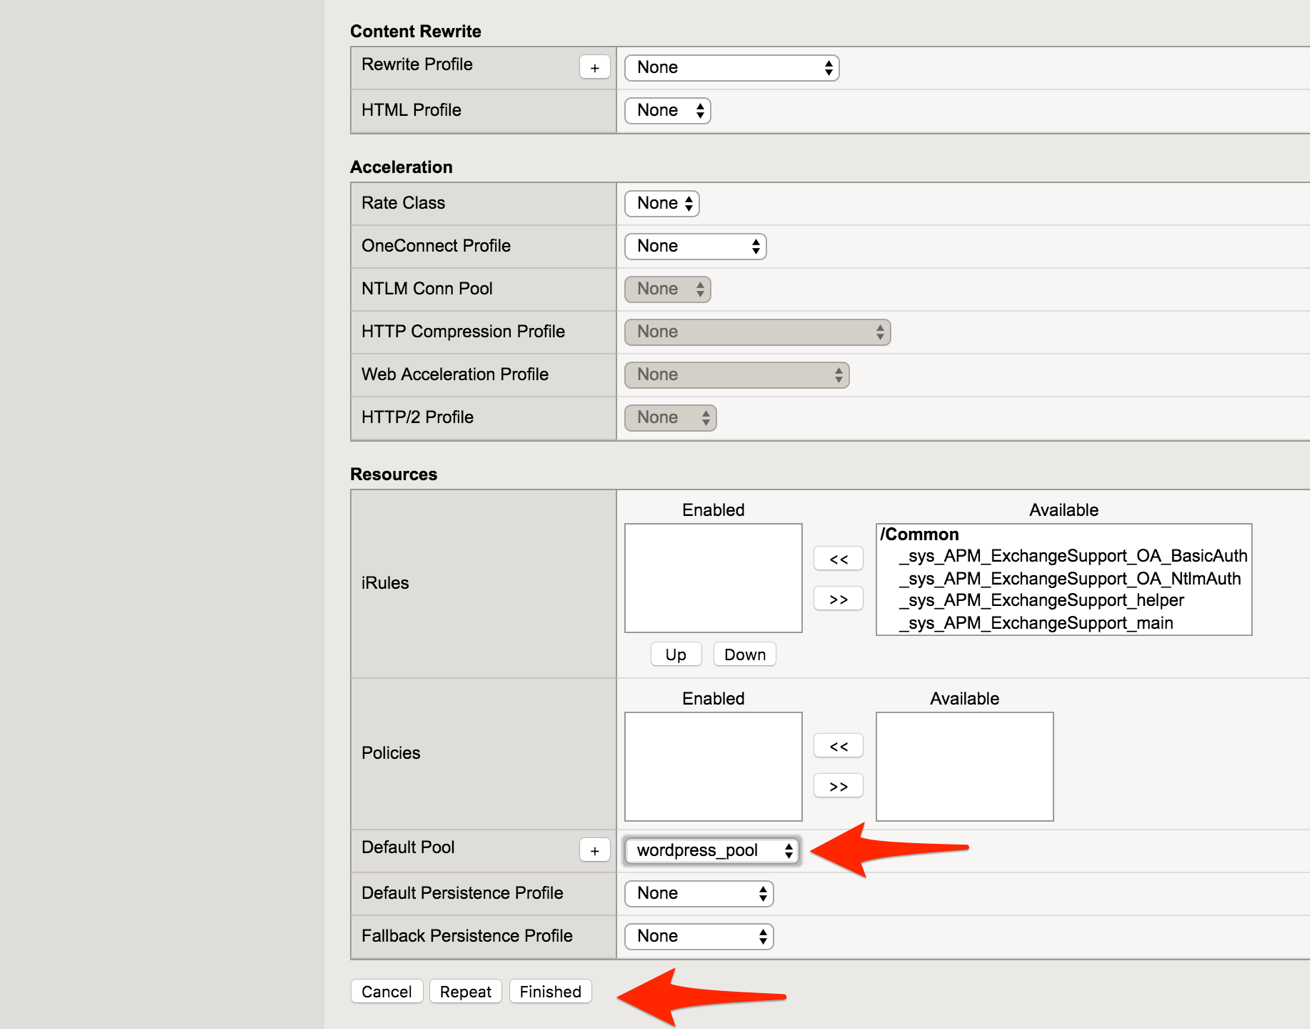
Click Finish
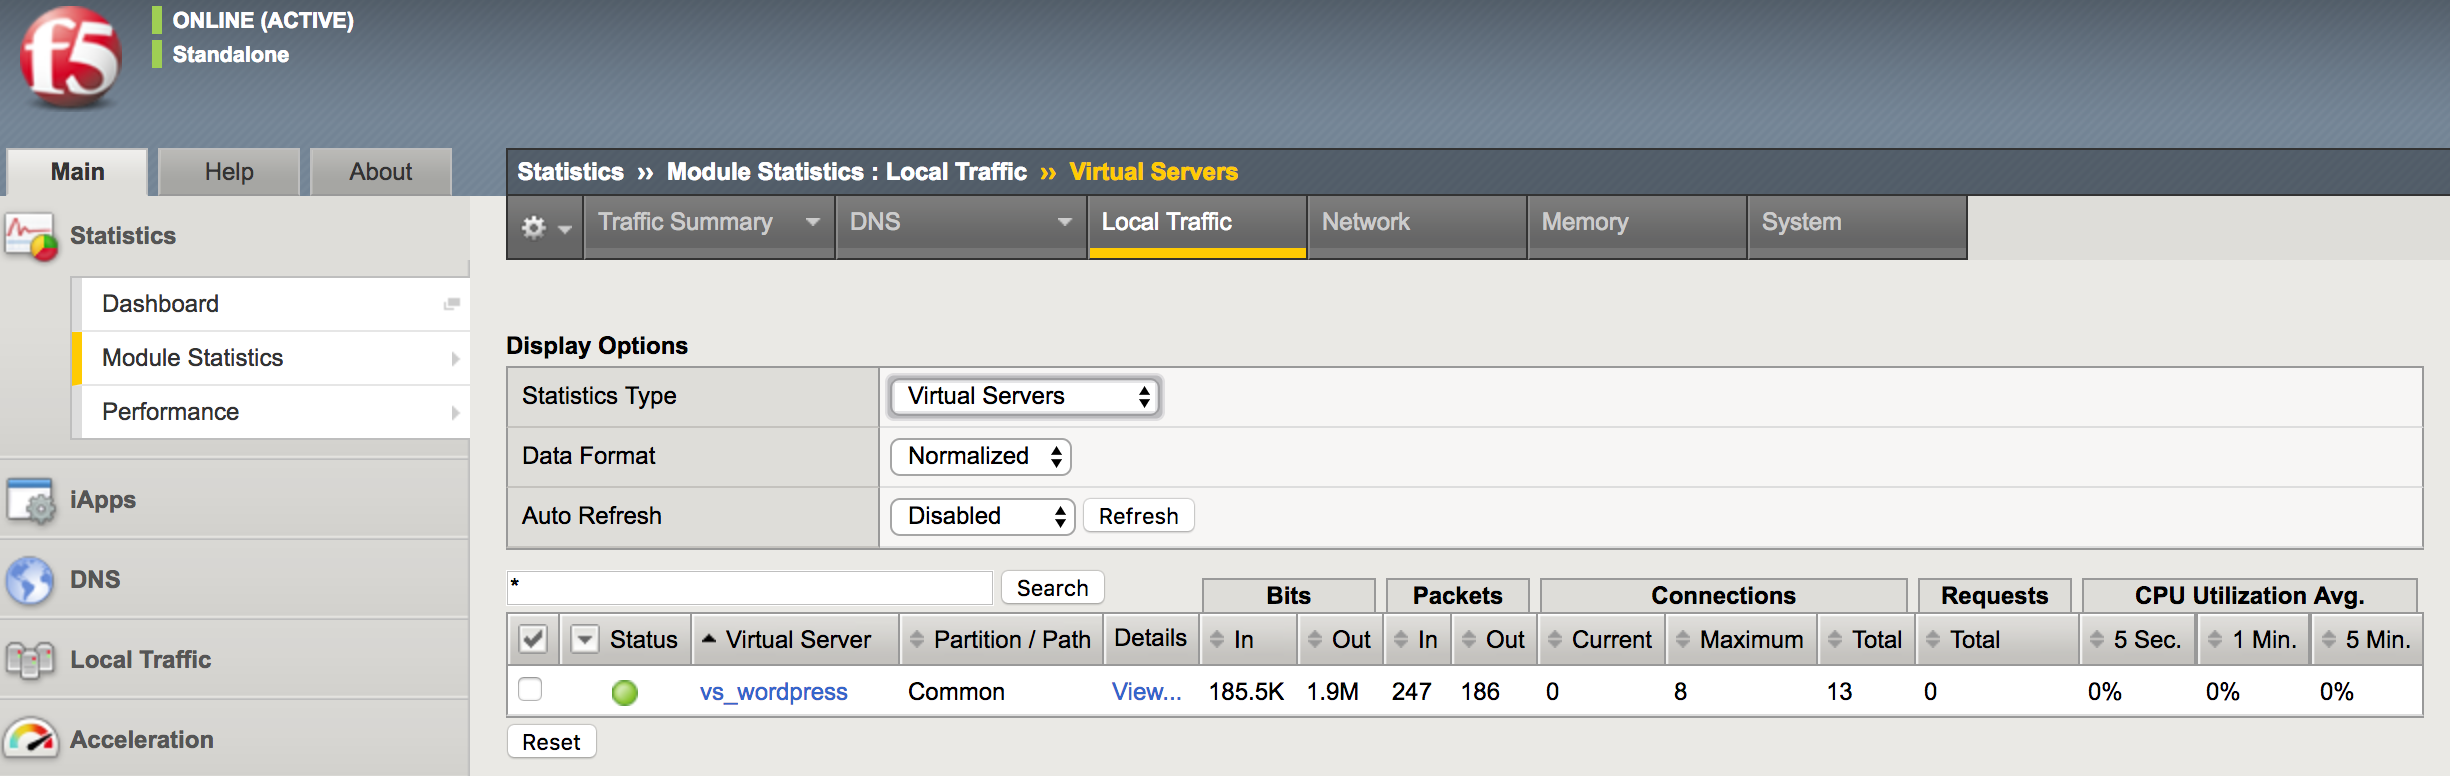
You have now completed the BIG-IP configuration for the WordPress application. To verify proper functionality, let’s browse the site and verify F5 statistics.
Open a browser to to https://<F5-public-VIP-IP> and ensure it displays your WordPress blog.
Note
As part of this task, you will see a certificate warning. You can ignore this as in this lab you did not generate the server certificates. In real life, you would ensure you have installed valid certificates.
Now check the statistics of your virtual server to verify traffic flow, by navigating to Statistics -> Module Statistics -> Local Traffic
Under Statistics Type, select Virtual Servers
2.1.6. Task – Disable direct Internet access to WordPress
You now need to modify the Network security group to remove direct inbound access to the WordPress application.
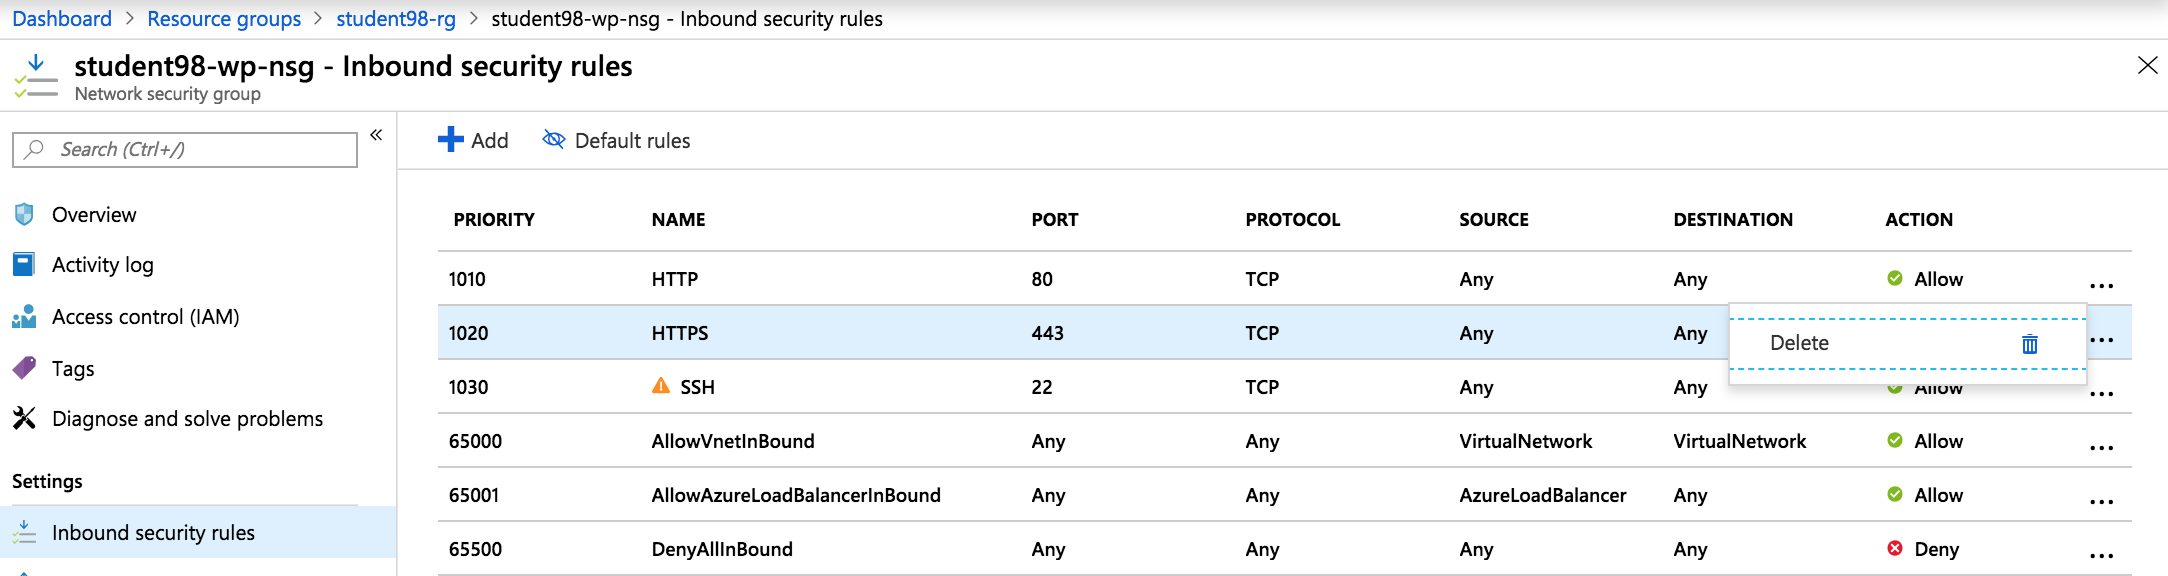
Select Resource Group > student##-rg > student##-wp-nsg then inbound security rules
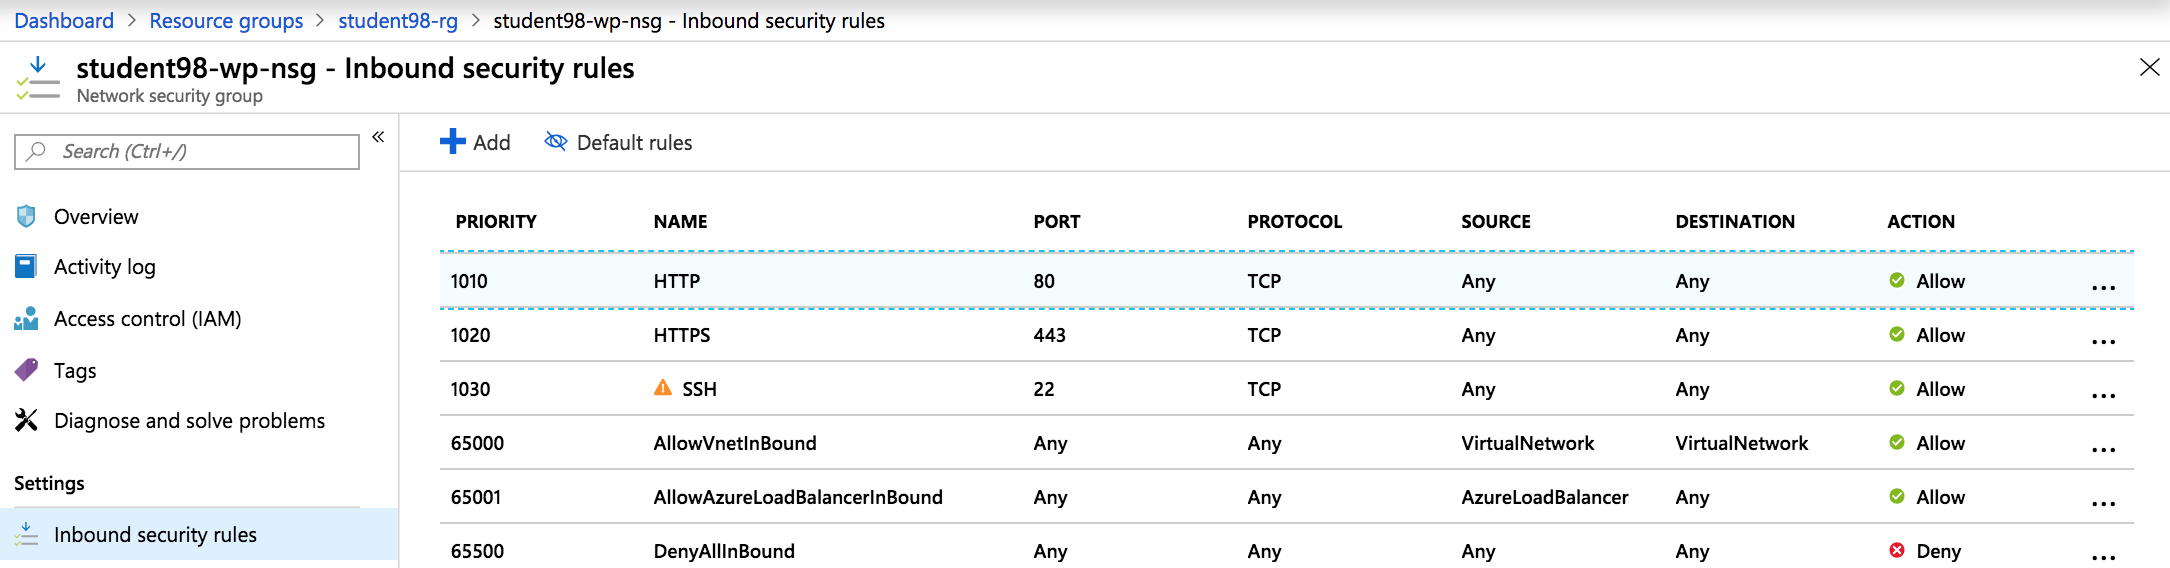
Click on the … link at the far right side of the HTTPS inbound rule and select Delete
Note
You will only allow web access to the WordPress blog via the F5 BIG-IP.
Confirm the delete action when prompted by clicking Yes
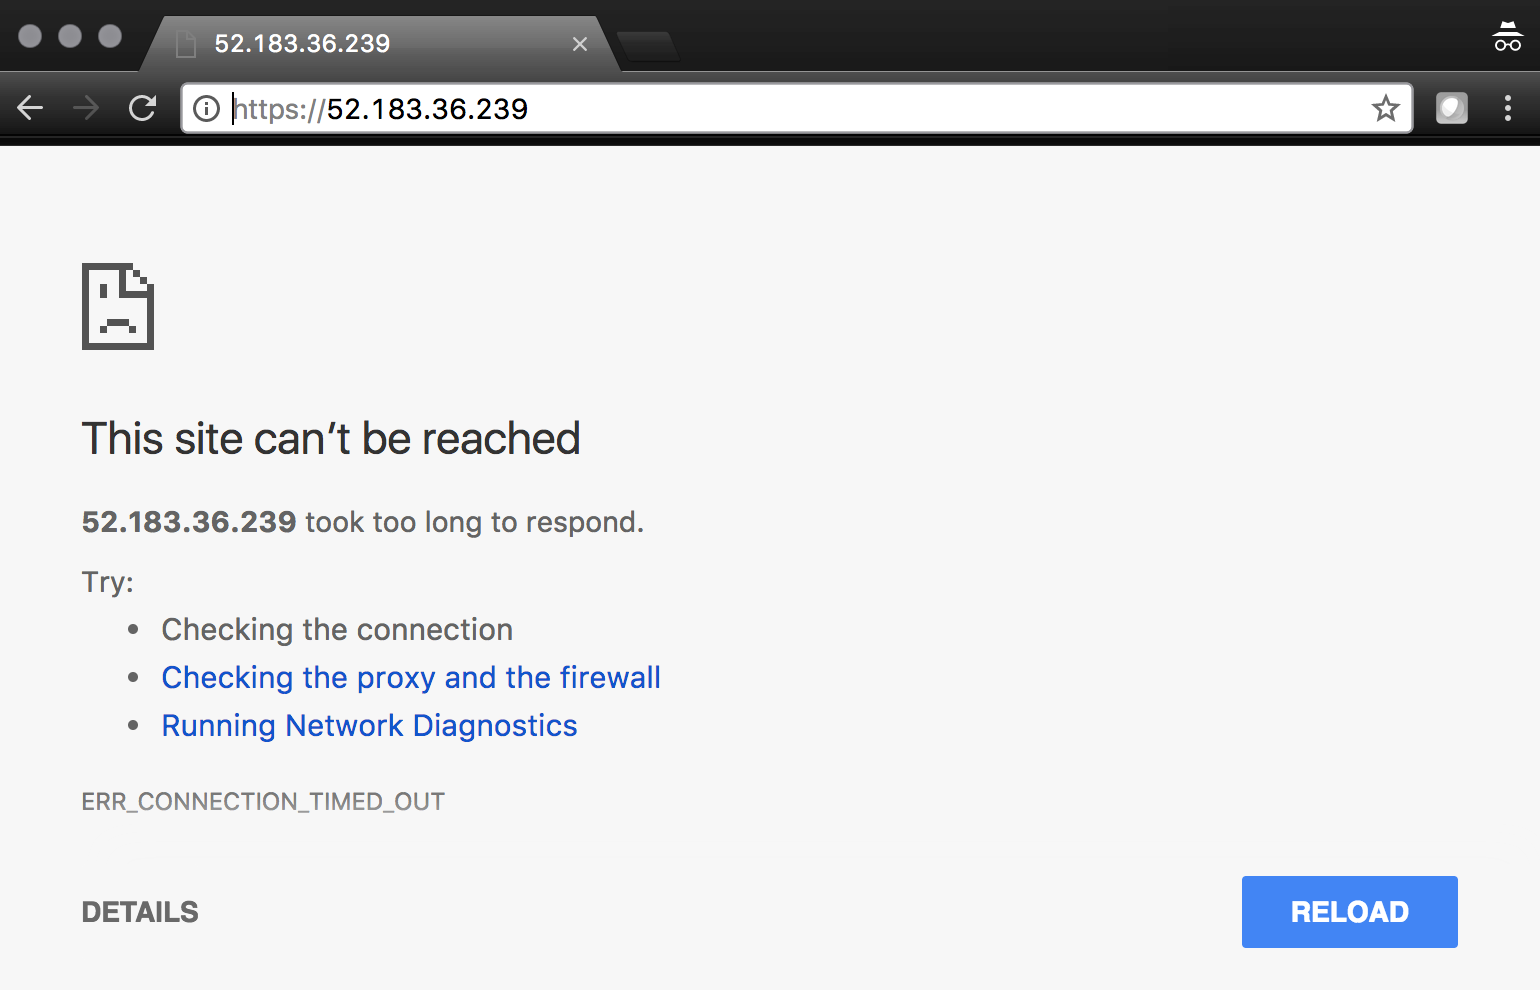
Verify that https://<WordPress-Public-IP> does NOT display the WordPress blog
2.1.7. Task – Lab 1 Teardown
Skip this Task if you intend to do the Azure Security Center Lab.
Delete resource group student##-rg created earlier in this lab.
- From Azure Portal select Resource Group
- Select … on right side of the resource group created earlier
- Select delete. You will be prompted to enter resource again for confirmation.
Enter resource group name when prompted for resource group to be deleted.

This concludes Lab 1